Learn how to crochet a purr-fect cat beanie with easy-to-follow steps and tips to keep your head cozy and stylish.
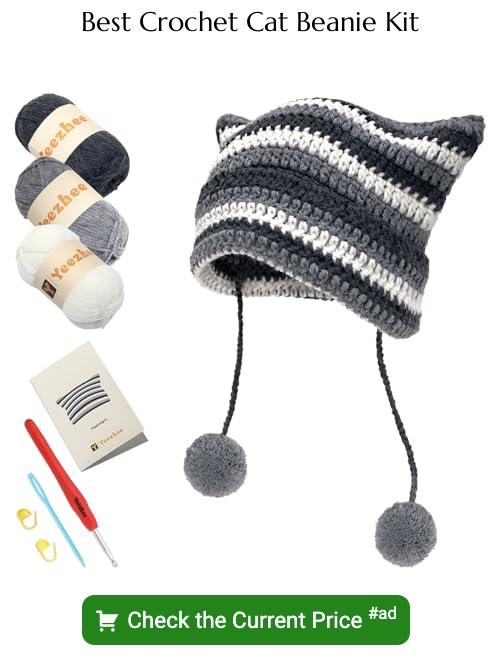
Ready to turn your feline friend into the cat’s meow of fashion? Grab some cozy worsted weight yarn and your trusty crochet hook because this guide has you covered. From getting that purr-fect fit to mastering must-know stitches like sc and dc, you’ll have a cat beanie whipped up in no time. We’ve got size tips, gauge secrets, step-by-step instructions, and even cute little finishing touches. Let’s get that kitty strutting!
Key takeaways:
- Use worsted weight yarn for coziness.
- Get the right gauge for a perfect fit.
- Choose the size based on your cat’s head.
- Learn key stitches: sc, dc, magic circle.
- Follow step-by-step instructions, adding finishing touches.
Materials
You’ll need some yarn, of course. Opt for a soft, medium-weight yarn. It’s cozy, and cats love cozy, right? Think worsted weight yarn – it’s versatile and easy to work with. Color is up to you. Maybe match your cat’s fur to make it a “where’s-the-cat-gone?” game.
Get hold of a crochet hook, size H-8 (5mm) works great for most worsted weight yarns. Don’t stress, it’s not a magic wand; it just pulls yarn through loops.
You’ll need a yarn needle to weave in ends. Who wants stray ends messing up the masterpiece? Grab some scissors for snipping yarn. And finally, stitch markers can be helpful for keeping track of rounds. All set to get the yarn rolling!
Gauge
Getting gauge right is crucial for a properly fitting cat beanie. Otherwise, your feline friend might end up looking like they’re wearing a lumpy tea cozy.
Here’s what to know:
- Gauge refers to the number of stitches and rows per inch.
- Always use the recommended hook size mentioned in your pattern to match the gauge.
- Make a swatch first. Yes, it’s a mini practice run, but it’s like a test drive for your yarn!
- If your stitches are too tight or loose, adjust your hook size up or down accordingly.
Think of it as a catwalk fitting session for your kitty—precision matters!
Sizes
Finding the right fit for a cat beanie can feel like guessing the number of jelly beans in a jar—tricky, but fun! Cats, much like humans, come in various sizes. Here’s how to make sure your feline fashionista looks fabulous.
Measure the circumference of your cat’s head. Use a flexible measuring tape (or a piece of string if your cat is convinced the tape is a new toy). Aim for a snug fit, but not too tight. You want your feline friend to look stylish, not like they’re in a headlock.
Cats generally fall into small, medium, and large sizes. Small is suitable for kittens, medium often fits most adult cats, and large is for those fluffy giants who look like they could moonlight as mini tigers.
Check your gauge. Different yarns and hooks can change the size drastically. Swatch it out if you need to make adjustments. A swatch can save you from ending up with either a teeny hat or something that looks like a cat umbrella.
When in doubt, err on the side of slightly larger. Better to have a beanie that’s a bit too big than one that will launch off like a slingshot.
Stitch Guide
Master these stitches to conquer your cat beanie:
Single Crochet: The basic building block of your masterpiece. Insert hook, yarn over, pull through, yarn over again, and pull through both loops. Easy peasy.
Double Crochet: Taller and more dramatic. Yarn over first, insert hook, yarn over, pull through, yarn over again, pull through two loops, yarn over, pull through the final two loops. Think of it as the skyscraper of stitches.
Magic Circle: The ultimate starting point for a crocheted-in-the-round project. Wrap yarn into a loop, insert hook, pull up a loop, then crocheting your stitches into the circle. Pull it tight like a secret handshake and you’re golden.
Increasing: For making bigger shapes without frogging your work. Simply place more than one stitch in the specified stitch. Usually, two crochets into one stitch do the trick.
Decreasing: For a gently sloping shape or to taper off. Yarn over, insert hook, yarn over, pull through, insert into next stitch, yarn over, pull through two loops, then yarn over and pull through remaining loops. It’s like crochet magic.
Instructions
Start by creating a magic ring and crochet 6 single crochets (sc) into the ring. Pull tight to close.
For round 2, crochet 2 sc into each stitch around. You should have 12 stitches now.
In round 3, increase again by crocheting 1 sc in the first stitch, then 2 sc in the next. Repeat this all the way around. You should end up with 18 stitches.
Continue increasing by following the same method: for round 4, alternate between 1 sc in each of the next 2 stitches, then 2 sc in the next until the end of the round. For round 5, alternate between 1 sc in each of the next 3 stitches, then 2 sc in the next. Keep going until the beanie fits your cat’s head, using the same increase pattern.
Once the crown of the beanie is wide enough, just crochet 1 sc in each stitch around without increasing. Do this until the beanie is the right height.
For earflaps, find the position where you want them and crochet 5-6 stitches across. Turn and sc back, decreasing 1 stitch at both ends each row until you have a small triangle.
Add ties to the earflaps if you want it snug. Simple chains will do, but tassels are a purr-fect touch.
Finishing
Once your crocheted cat beanie resembles something wearable, it’s time to give it those final touches that will make it purr-fect!
- Weave in all loose ends. Nobody wants extra yarn ends tickling their forehead like a mischievous kitty.
- Use a yarn needle to sew any seams shut. Think of it as giving your beanie a snug kitty cuddle.
- For the cat ears, fold each ear in half at the base and sew them firmly onto the top sides of the beanie. Make sure they’re symmetrical unless you’re going for that quirky, off-centered look—cats sometimes do.
- Give your beanie a gentle steam blocking if it’s looking a bit wonky. This will help it relax and shape up, kind of like a cat nap.
- Finally, add any embellishments like eyes, a nose, or whiskers if you really want to unleash the meow factor. Embroidery floss works well for this and keeps the whiskers from curling like your cat’s tails when they’re plotting mischief.


