Learn how to crochet a charming flower that will add a delightful touch to any hat.
Got a hat that needs a pop of floral fabulousness? You’re in the right place! From gathering just the right materials to the final, glorious stitch, this guide to crocheting a flower covers it all. By the end, your hat will boast a crocheted bloom that even Mother Nature would envy. Ready your hooks and let’s turn that plain hat into a showstopper!
Key takeaways:
- Gather yarn, hook, scissors, tapestry needle, and button.
- Follow pattern abbreviations for efficient crocheting.
- Use magic ring and double crochet for flower center.
- Customize with colors, textures, and embellishments.
- Hand wash and lay flat to maintain flower shape.
Materials Needed
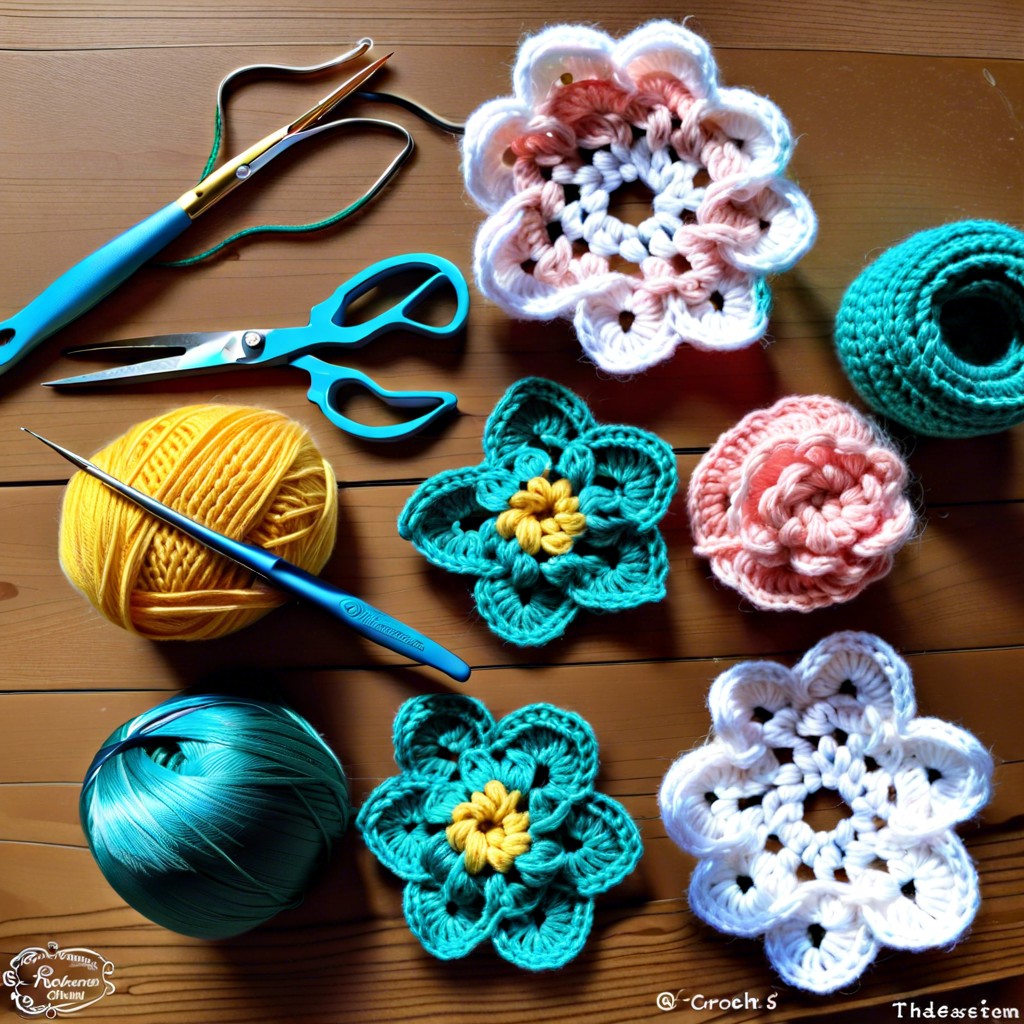
Gather a slim collection of these essentials:
- Yarn: Opt for a soft, medium-weight yarn, like cotton or acrylic. Variegated or solid, your bloom will be beautiful.
- Hook: Grab a 4.0mm (G) crochet hook for controlled, tight stitching. Change hook sizes to adjust petal size, tank-sized flowers anyone?
- Scissors: You’ll need them to snip yarn—no chewing allowed! Precision is key.
- Tapestry Needle: This is for weaving in those sneaky ends. It’s like hiding the evidence.
- Button (optional): If you want your flower to stand out even more, a button center adds a pop of pizzazz.
Pattern Abbreviations
Understanding the abbreviations is like cracking the crochet code – adventurous and thrilling! Here’s your decoder ring:
- ch – chain. It’s the crochet equivalent of laying the groundwork. Ready, set, ch!
- sc – single crochet. One stitch, straight to the point, no fuss.
- dc – double crochet. Bigger, bolder stitch, because sometimes you just need double the fun.
- sl st – slip stitch. Sneaky little stitch that’s here one second, blended the next.
- rep – repeat. Imagine your favorite song on loop. Crochet loves repetition too.
These shortcuts are your secret sauce to speed through patterns like a pro. Now go forth and crochet like a wizard!
Crochet Flower Instructions
Start with a slipknot on your hook. This will be the jumping-off point for a fabulous floral creation.
Chain 4 and then join into a ring with a slip stitch. Think of this as building the literal center of attention.
Next, chain 3. This will count as your first double crochet (dc). You’re already halfway to petal perfection!
Do 11 more double crochets into the ring. Yes, you’ll love the repetitive rhythm. You should have 12 double crochets total.
Slip stitch to the top of your first chain 3 to close the round. You’ve got a neat little base ready for its petals.
Chain 3 again. This starts your first petal.
Double crochet into the same stitch. We’re giving this flower some serious dimension.
Chain 1, then 2 double crochets into the next stitch. You’re rounding the corner of your first petal.
Repeat the process around: 2 double crochets, chain 1. Think of it like a dance move you’re almost mastering.
Slip stitch to the first chain 3. Voilà! You’re done with the basic shape.
Admire your progress. Adjust any petals that are shy and need a little fluffing. You’ve done it!
Creating the Center of the Flower
Start by making a magic ring. This magical loop is your flower’s humble beginning. If magic rings could talk, they’d say, “Let’s get loopy!”
Next, chain 4 – think of it as sending your yarn on a mini-vacation. Fly it up and away!
Slip stitch into the ring. Secure it like a bungee cord keeping things in place.
Now crochet 11 double crochets into that same ring. It’s like stuffing a circus clown car – the more you fit, the better.
Finally, pull the magic ring tight, closing up your flower center. Presto! You’ve now got the eye of your floral masterpiece.
Making the Petals
Start by chaining five and joining with a slip stitch to form a ring. This is where the magic begins, folks! Into this ring, work 12 single crochets. It’s like putting down the foundation for a tiny yarn pizza.
Next, prepare to make those gorgeous petals. For each petal, [chain two, double crochet into the next stitch, chain two, slip stitch into the same stitch]. Repeat this dreamy combo in each stitch around the circle. By the end, you’ll have yourself a daisy circus on a tiny stage.
Keep in mind, crochet loves a bit of tension – but not too much! Loosen up if your petals are more like rocky outcrops than soft blooms. You’ve got this!
Attaching the Flower to the Hat
First, lay your hat on a flat surface. Decide on the perfect spot for your flower. Most people opt for the side, but feel free to go wild. Center? Off-center? It’s a free-for-all.
Using a yarn needle and a matching yarn, start stitching from the underside of the hat. Secure the center of the flower first. Think of it like anchoring the middle of a target.
Next, tack down a few points around the edges of the petals. This will keep the flower from wobbling like a bobblehead on a bumpy road.
Double-check your stitches are snug but not too tight. You want it securely fastened, but without puckering the hat.
To finish off, weave in any loose ends on the inside of the hat. Snip away any excess yarn. Give your hat a little shake to ensure the flower stays put.
Voilà! Flower power complete.
Finishing Touches
Snip any excess yarn, leaving a few inches for weaving in. Use a yarn needle to weave the ends back into the flower, hiding them like a secret stash of chocolate. Ensure that all your stitches are secure to avoid any spontaneous flower petals dancing off into the sunset.
For added pizzazz, consider sewing a cute button or bead into the center. Who doesn’t love a little bling?
Give your flower a gentle fluff to shape the petals nicely. If it’s feeling flat, a bit of steam blocking can perk it up, just like a good cup of coffee perks you up on a Monday morning.
For the final touch, step back and admire your handiwork. Maybe snap a pic for Instagram and watch those hearts roll in!
Customizing the Flower
Want to jazz up your crocheted flower? It’s easier than finding a yarn stash sale!
First, play with colors. Use different hues for the petals and center to create a vibrant look. Ombre, rainbow, or even a color that shouldn’t exist in nature—have fun with it.
Varying yarn textures can add a whole new dimension. Think fluffy yarn, metallic threads, or even a combination of both for a truly unique masterpiece.
Size matters. Change your hook size or add more rounds to make a larger flower. Use finer yarn and smaller hooks for a dainty, delicate bloom.
Add some pizzazz with embellishments. Small beads, sequins, or even a tiny button in the center can turn an ordinary flower into something extraordinary.
Finally, give each petal a personality. Mix different crochet stitches or add a subtle edging to make each petal stand out.
Let those creative juices flow, and watch as your crochet flower becomes a tiny masterpiece that adds charm and flair to any hat!
Troubleshooting Common Issues
If your flower looks more like a wilted weed than a blooming beauty, don’t fret. Here are a few common hiccups and their fixes:
If your stitches are too loose, your flower might look floppy. Tighten up your tension a bit.
Wonky petals? Make sure you’re consistent with your stitch counts and that you’re not adding or dropping stitches along the way.
If the flower is curling too much, you might be crocheting too tightly. Loosen up that grip a tad.
For flowers that don’t lie flat, block them. Pin them out and give them a little steam bath to relax those stitches and shape them up.
Mismatch between the flower and hat yarn? Try using the same yarn weight for both to ensure a harmonious look.
Got a petal out of place? Just tug and coax it into shape. Remember, yarn has a surprisingly forgiving nature.
Happy troubleshooting and keep those flowers blooming!
Care Instructions
Now that your hat is blooming with a beautiful crochet flower, let’s keep it looking fresh. Proper care is key:
Gently hand wash in cool water using mild detergent. Scrubbing is a no-no.
Rinse thoroughly but handle with kid gloves to avoid stretching.
Wrap in a towel and press to remove excess water. No wringing unless you want an accidental beret.
Lay flat to dry. Shape the flower petals while damp to maintain their perky look.
Avoid direct sunlight during drying, lest your vibrant creation gets sunburned.
Store in a cool, dry place. Moths love yarn nearly as much as you do.
These simple steps will ensure your crochet flower and hat combo stays dazzling for many seasons.


