In this article, you will learn step-by-step how to slowly crochet a beginner-friendly hat.
So, you’ve decided to crochet a hat and want to take it step by step? You’re in the right place! This guide will walk you through everything from choosing the perfect yarn to adding those fabulous final touches, all in easy, digestible steps, like nibbling on your favorite snack. Grab your hook, breathe deeply, and let’s turn that yarn mess into a majestic, cozy hat masterpiece.
Key takeaways:
- Choose worsted weight yarn and H/8 hook
- Practice basic crochet stitches before starting
- Create base chain for hat’s foundation
- Increase stitches for crown, maintain tension
- Personalize with pom-poms, buttons, or crochet flowers
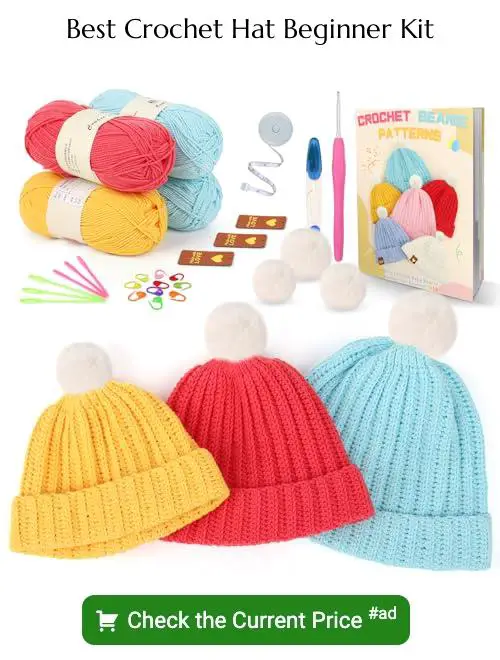
Materials and Tools Needed
You’ll need just a few things to get started. Grab a comfy seat and let’s dive in. First up, you’ll want some worsted weight yarn – think medium thickness, perfect for beginners. Pick a color you love, or go wild with a rainbow mix.
Next on the list is a crochet hook. For the yarn we’re using, a size H/8 (5mm) hook will be your new best friend. Trust me, it’s like the magic wand of yarn crafting.
Don’t forget a pair of sharp scissors. Those end bits of yarn won’t beautifully snip themselves.
A yarn needle is essential for weaving in ends like a pro. No, seriously, your hat will look way more polished.
And just to be safe, a measuring tape will keep you in check. Hats love to grow bigger (or smaller) if left unchecked.
Lastly, keep some stitch markers handy. They’re like little road signs to keep you from getting lost. Handy, right?
Selecting the Right Yarn
For your fabulous crochet hat project, selecting the yarn is almost like picking your own adventure.
First, consider the yarn weight. A worsted or medium-weight yarn is your best buddy here. It’s thick enough to work up quickly but not so chunky that you’ll end up with a hat suited for a grizzly bear.
Next, fiber content. Acrylic yarns are like trusty sidekicks, easy to manage and come in zillions of colors. If you crave a touch of luxury, wool blends offer great warmth and a bit of stretch, perfect for snug fits.
Lastly, color choice. Pick a hue that tickles your fancy. Dark colors hide mistakes, light colors show off your stitches. Multicolored yarns can create a party on your head without any extra effort.
So, grab that yarn that screams “YOU” and get ready to stitch your way to hat-making glory.
Choosing Your Hook Size
When it comes to hooks, size does matter! The right hook size will ensure your hat is comfy and chic, not a funky, wonky mess.
First, check your yarn label. It’ll spill the beans on the recommended hook size. Easy peasy.
For beginners, go with aluminum or plastic hooks. They’re lightweight and glide through yarn like butter.
Size matters, so start with a medium-sized hook, around 5mm or an H-8. It’s the Goldilocks of hook sizes—not too big, not too small.
Remember, tight stitches mean a smaller hat, while loose stitches create a floppy one. Feel your stitches and adjust your hook size if needed. Trust your instincts, crochet wizard!
Understanding Basic Crochet Stitches
First up, the chain stitch. Think of it as the foundation of your hat, like the breadcrumbs leading Hansel and Gretel through the forest. Yarn over, pull through the loop, repeat. Simple as pie.
Next, meet the single crochet. Your go-to buddy for tight, sturdy stitches. Insert hook, yarn over, pull through the stitch, yarn over again, pull through both loops. Boom! You’ve made a stitch.
Now, the half double crochet. It’s like the single crochet’s chattier cousin. Yarn over, insert hook, yarn over again, pull through the stitch, yarn over, pull through all three loops on the hook. Friendly, but not too complicated.
Lastly, the double crochet. This one’s all about height and drama. Yarn over, insert hook, yarn over again, pull through the stitch, yarn over, pull through first two loops, yarn over, pull through the last two loops. Your hat is getting some height now, just like a perfectly risen cake.
Remember to practice these basic stitches before diving into your hat project. Patience you must have, young padawan!
Making the Base Chain
Start with creating a slip knot and placing it on your hook. It’s like giving your hook a cozy little noose—just without the ominous undertones.
Next, wrap the yarn around your hook, a maneuver known as “yarn over” or “YO” in crochet lingo. Pull this yarn through the loop already on your hook. Ta-da! You’ve created one chain stitch.
Keep that rhythm going: yarn over, pull through the loop. Repeat until you’ve got a chain that’s as long as the circumference of whatever noggin will wear this hat. Count your stitches—just to be safe—so that you don’t end up with a hat fit for a giant or a mouse.
The key here is consistency. Try to keep your tension even, avoiding wild variations that might turn your base chain into a roller coaster ride for yarn.
Forming the Hat’s Crown
Start by creating a magic ring, also known as a magic loop. It sounds fancy, but it’s just a way to start crocheting in the round. Once that’s done, crochet your first round of single or double crochet stitches into the loop.
In subsequent rounds, you’ll need to increase the number of stitches. This is what gives your hat its shape. Increase evenly, adding stitches so it grows like a glorious mushroom top. Trust the process—your hat won’t look like a hat right away, but it’s getting there.
Remember to count your stitches. It’s like counting sheep but more productive. Increase each round until the circle is as wide as you need it. Too small? Keep going! Too big? Maybe rethink your yarn choices. Keep your tension even, breathe deeply, and enjoy the journey. Your crown is the royal foundation of your cozy creation.
Building the Hat’s Sides
Once you’ve got the crown under control, it’s time to get those sides looking sharp. Keep crocheting in the round, but now we’re aiming for height, not width. Here’s how:
First up, switch from increase rounds to straight crochet. This means no more adding stitches; just keep it steady Eddie and crochet one stitch into each previous stitch. Steady growth is key.
Measure as you go. Grab a ruler or tape measure and keep checking the height. This is your wearable art, not a guessing game. Be the boss of your yarn.
Want to add some flair? This is the perfect spot. Try alternating colors or throwing in some different stitches like half-double crochet. Who said hats can’t have personality?
The sides are all about rhythm and flow. Find your zen, keep those hands moving, and watch your hat take shape row by row!
Shaping the Hat’s Brim
The brim is where your hat starts to show personality. Here’s where you can add a little flair or keep it simple. To shape the brim, follow these steps:
First, continue crocheting in rounds. This keeps everything even and minimizes any weird lumps.
Next, increase stitches as needed. If you want a flared brim, increase more stitches. For a snug brim, fewer increases do the trick.
Consider switching to a smaller hook. It tightens the stitches, giving a snug fit.
Experiment with stitch patterns. Try single crochets for a sturdy brim or half-double crochets for a flexible one.
Finally, finish off with a slip stitch. This ensures a neat edge, leaving your hat ready for the final touches.
Joining Seams and Finishing
Now, envision your hat looking fabulous and almost finished. Time to bring it all together.
First, grab your yarn needle and thread it with a length of yarn. You’ll be playing matchmaker for those edges now.
Align your hat’s edges. Think of this as an arranged marriage; you want everything to line up nicely.
Use the whip stitch or mattress stitch along the edges. Both are simple and effective. The whip stitch wraps around the edges, while the mattress stitch zigzags discreetly.
Fasten off when you’ve stitched the edges together. Pull tight to secure, but not so tight that your hat looks like it squeezed into skinny jeans.
Weave in any loose ends. This is your yarn’s time to hide and seek. Make sure they’re hidden well within the fabric so they don’t peek out and embarrass you later.
Give your hat a gentle tug and a little stretching here and there. Think of it as a light yoga session for your newly crocheted creation.
And voila! The seams are joined, and your hat is ready for its debut.
Adding Personal Touches and Embellishments
Add some flair to your handmade hat by playing with different embellishments! Here are some simple ideas to make your creation truly one-of-a-kind:
Consider adding a pom-pom on top. It’s classic, it’s cute, and it’s easy to make. Use leftover yarn or mix colors for a fun twist.
Why stop at one color? Experiment with stripes or color blocks. You’ll look like a crochet Picasso.
Buttons aren’t just for keeping shirts closed. Sew on a few decorative buttons for an extra dash of charm.
Ever heard of crochet flowers? They are a delightful addition. Make a couple in complementary colors and attach them near the brim.
And for those who like a bit of sparkle, weave in some metallic thread or add a few sequins. Shine bright like a diamond!
Personalizing your hat is like giving it a little bit of soul. So go wild, get creative, and most importantly, have fun!


