Learn how to crochet an adorable snowman with step-by-step instructions and tips in this easy-to-follow guide.
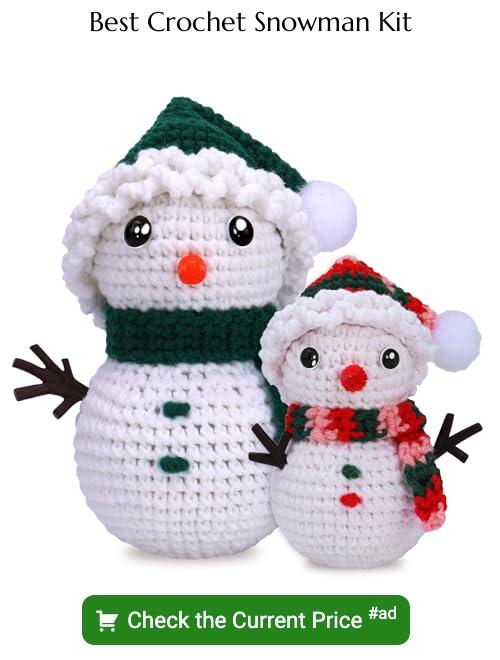
Ready to crochet the cutest snowman ever and make Olaf jealous? You’ve landed in the right snow drift! We’ll cover everything you need: from conjuring up the perfect magic ring for that round little noggin, to mastering single crochet stitches. You’ll learn how to shape with increases and decreases, link rounds with slip stitches, and switch yarn colors seamlessly for those iconic details. Grab your hooks, let’s sculpt some yarny Frosty magic!
Key takeaways:
- Magic ring for head and body roundness
- Single crochet stitches for body building
- Increase and decrease stitches for shaping
- Slip stitches for joining rounds
- Change yarn colors for details
Needed Techniques
To bring our frosty friend to life, you’ll need a few fundamental crochet techniques under your belt. Let’s keep it warm and simple.
First up, the magic ring. It’s like a cozy circle that jumpstarts your snowman’s roundness. Perfect for forming his plump head and body.
Next, master single crochet stitches. These little heroes are your main body builders. Sturdy, reliable, and easy on the hands.
Increasing and decreasing stitches are essential too. Think of them as your snowman’s tailor, shaping him into a dapper gent with impeccable curves.
Don’t forget slip stitches! These tiny maneuvers are nifty for joining rounds. It’s like giving your snowman a quick handshake.
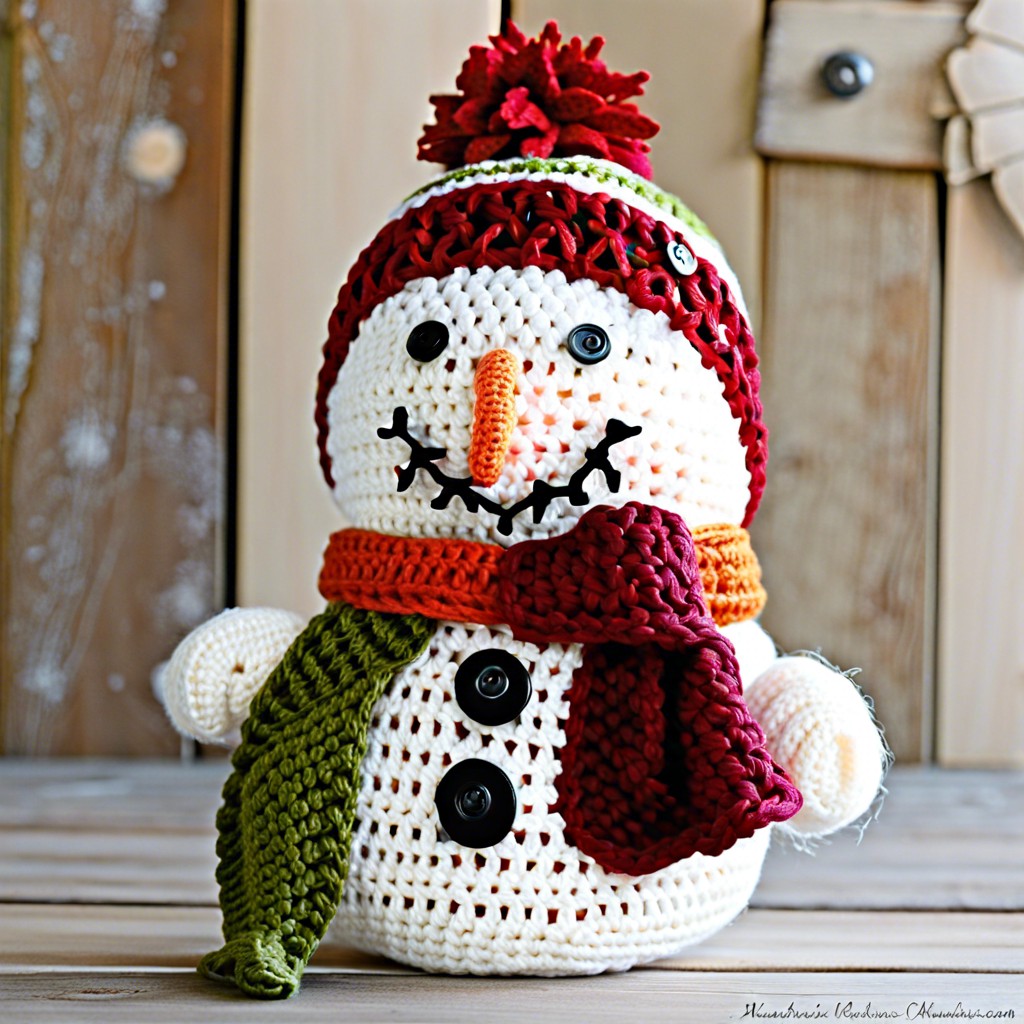
Lastly, learn to change yarn colors seamlessly. Your snowy buddy needs that carrot nose and maybe a jaunty hat!
Needed Materials and Tools
Gather your materials like a pro chef assembling ingredients. First up: yarn. Pick a soft, squishy worsted-weight yarn in white for the body. For eyes, buttons, and other decor, grab some black and orange yarn.
Next, you’ll need a trusty crochet hook. A G/4mm hook should do the trick. Don’t forget stuffing to plump up your snowman; polyfill works well.
Safety eyes can add a realistic touch—unless you want your snowman to look permanently surprised, then by all means, embroider those pupils wildly.
Finally, bring in a yarn needle for sewing parts together, and a stitch marker to precisely track rows. Don’t skip the stitch marker, unless you enjoy living dangerously on the edge of crochet chaos.
One last thing, a cozy beverage wouldn’t hurt. Crochet and cocoa, anyone?
Crochet the Head and Body
Start with a magic ring and crochet single crochets to form a small circle. Increase in each round, just like adding sprinkles to cookies, until the sphere reaches the right size. This forms your snowman’s head.
Once the noggin is done, continue crocheting downward for the body. Keep increasing stitches in a few rounds to give your snowman some jolly girth. No one likes a flat snowman!
After hitting mid-waist, stop increasing and just crochet evenly around. Think of it like giving your snowman a long cuddle. Keep going till the tubby body is as round as you like.
Stuff it with fiberfill as you go. Nobody wants a deflated snowman! And Bob’s your uncle, you’ve got a head and body ready to make Frosty proud.
Crochet the Legs (2)
With your yarn and hook at the ready, create a magic ring. Think of it as a lasso to corral those stitches.
Into this magical loop, crochet six single crochets. This will be the start of your jolly snowman’s legs.
Increase the round by doing two single crochets in each stitch. That’s right, double the fun in every stitch.
Continue building up the leg by doing one single crochet in each stitch for several rounds. Soon, you’ll have a little tube that could double as an elf’s megaphone.
Finish off and fasten, but don’t tie yourself in knots.
Repeat the process for the second leg. Remember, snowmen need symmetry!
Crochet the Arms (2)
Start with a magic ring. Pull out your best sleight of hand, because magic rings are as enchanting as they sound. Crochet six single crochets into the ring. Yes, it really is that simple. Tighten the ring and have a little “ta-da” moment.
From there, increase in each stitch around. Imagine you’re feeding your crochet some spinach – big and strong. You’re aiming for twelve stitches by the end of this round.
Next, single crochet in each stitch for the next six rounds. A bit repetitive, but hey, think of it as your crochet mantra. Each stitch brings you closer to snowy arms perfection.
Once length looks good, stuff lightly with fiberfill. Not too much, we’re aiming for ‘plump snowman’ not ‘overstuffed pillowcase’. Fasten off and leave a long tail for sewing. Repeat everything for the second arm – because our snowman isn’t auditioning for a pirate role.
Finally, take a break, have a sip of hot cocoa because you’ve just crocheted your snowman some fabulous appendages.
Crochet the Hat
For the hat, you will want to start with a magic ring. Chain 2 (which is always a good practice, and not just for summoning crochet magic). Work 6 single crochets into the ring. Join with a slip stitch to the first single crochet to close the round.
From here, we are increasing: in the second round, make 2 single crochets in each stitch around (you should have 12 stitches now). By the third round, alternate – one single crochet in the first stitch, then 2 in the next, and so on. Continue this pattern of gradually increasing until your hat fits snugly on the snowman’s head.
When the hat is as wide as you want, work one single crochet stitch into each stitch around. This will give the hat its height. Remember, snowmen have small heads, so unlike a towering wizard’s hat, keep the height moderate. Finish off with a slip stitch and weave in the ends.
Pop the hat on your snowman, and he’ll be ready to brave the winter chill, or at least look charmingly warm.
Assembling
First, gather all your crocheted pieces: head, body, arms, legs, and hat. Make sure they’re stuffed just enough to hold their shape but not bursting at the seams. You want a plump snowman, not one ready to audition for a bodybuilding contest.
Using a yarn needle, start by stitching the head to the body. Align the stitches carefully; we don’t want a snowman with a wobbly noggin unless that’s your style, of course.
Next, attach the legs to the bottom of the body. Aim for even positioning so your snowman doesn’t look like it’s mid-dance move — unless you’re going for a disco snowman.
The arms come next. Sew them onto the sides of the body, just below the neck. Remember symmetry is key unless unintended comedy is your goal.
Lastly, perch the hat atop the head. Feel free to add a scarf or some buttons too. Secure everything tightly to make it kid-proof because little hands will likely want to give your snowman a hug.


