Learn the basics of crocheting hair with this beginner’s guide that covers everything you need to get started.
Key takeaways:
- Start with quality braided hair or cornrows
- Use a latch-hook needle for crocheting hair
- Hydrate your natural hair and extensions
- Be patient, it takes time to create a fabulous hairstyle
- Use a crochet hook to slide under the braids and secure the extensions
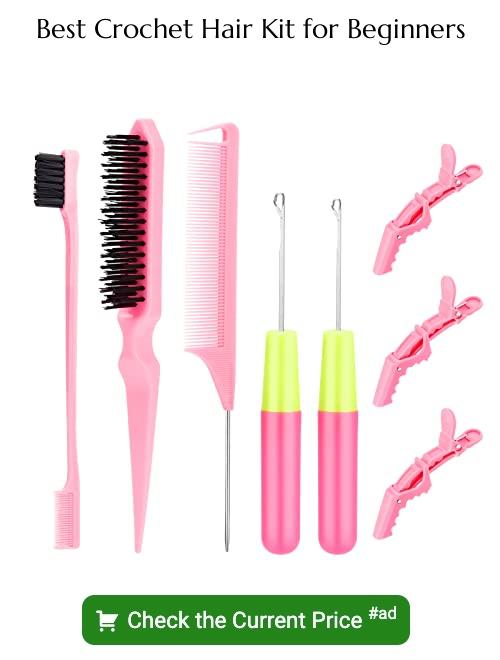
Things You Should Know
Start with quality braided hair or cornrows. The sturdier the foundation, the longer your style lasts. Choose hair extensions suited for crocheting, like pre-looped or bulk hair. These are way friendlier for beginners.
Use a crochet needle or hook, but don’t raid your grandma’s knitting basket. Those are different. Make sure it’s a latch-hook needle. Be ready to spend some hours on this, depending on the fullness you desire.
Keep scissors and a comb handy. Detangling and trimming are part of the adventure. Hydrate your natural hair and extensions. Dry hair equals brittle hair. Brittle hair equals bad hair days. Nobody likes those.
Finally, patience is key. Rome wasn’t built in a day, and your fabulous crochet hairstyle won’t be either. Enjoy the process—after all, you’re creating art.
Steps
Start by gathering your supplies: a crochet hook, synthetic hair extensions, a pair of scissors, and a latch hook. Make sure you’re in a comfortable spot, because you’re about to enter the Wonderful World of Crochet. No, there are no theme park rides, but you can sit on the couch.
Ensure your hair is clean and dry before starting. You don’t want a scalp surprise later.
Use the crochet hook to make a loop in the synthetic hair. Think of it as lasso practice for beginners.
Carefully attach the loop to a cornrow. You’ll hear a slight “click” in your imagination when it works.
Pull the ends of the synthetic hair through the loop and tighten. It should resemble a tiny, fashionable noose.
Repeat these steps, while binge-watching a series or listening to a podcast. By the end of season three, you’ll be a crochet pro!
Finally, trim any excess hair for a neat look. Be mindful—don’t get scissor-happy.
Enjoy your fabulous new look and relish in the compliments. You’re basically a hair magician now!
Braiding Your Natural Hair
Start by washing and conditioning your hair thoroughly. Clean hair helps extensions stay longer and look fabulous. Plus, nobody likes a dirty scalp party.
Dry your hair completely before you begin braiding. Damp hair is a perfect recipe for a bad hair day.
Use a comb to section your hair into manageable parts. Neat sections equal neat braids, and that’s the goal, isn’t it?
Decide on your braid pattern. Straight back cornrows are the go-to for many, but you can jazz it up with some creative patterns if you’re feeling adventurous.
Start braiding close to the scalp. Snug, but not so tight that you’re giving yourself an unplanned facelift.
Secure the ends of your braids with small, non-slip rubber bands. Because the last thing you want is a braid escape artist.
Moisturize your scalp and braids. Your hair still needs love and hydration under those extensions. Use a light oil or leave-in conditioner.
Inspect your braids for any stray hairs or uneven sections. A quick fix now saves a headache later.
Crocheting the Extensions
Use a crochet hook to slide under the braids you’ve created. Now, imagine you’re fishing but way cooler.
Grab a small section of the crochet hair with your hook. Pull it gently back through the braid, creating a loop. Are you seeing the magic yet?
Feed the ends of the crochet hair through the loop you just made. Tighten it close to the scalp. Congratulations, you’ve just secured your first strand like a pro!
Continue this process down each braid. Feels repetitive? That’s good. It means you’re doing it right.
Keep an eye on the spacing. Too close means a bulky mane; too far means a patchy outcome. Balance, like a tightrope walker, is key.
When you’re done, give a little shake. If nothing falls out, you’re golden. Looks good? Rock that new look with flair!
Removing the Crocheted Extensions
First things first, don’t panic. Removing crocheted extensions is easier than you might think. Snip the knots where the extensions attach to your braids. Aim for the top of the loop to avoid cutting your natural hair; unless you’re aiming for a new, unexpected hairstyle.
Gently pull the loose end of the extension downward. It should slide out smoothly, like a thread from a needle. If it resists, check for any sneaky knots.
If tempted to Hulk-smash through this process, remember: patience is key. Your natural hair will thank you for it later. Continue this method for each extension. Be thorough; you don’t want to realize you missed one after celebrating your victory.
Once all extensions are out, comb through your hair to remove any stray bits. Finish with a moisturizing treatment to pamper your natural locks. There you go, extension-free and fabulous.


