Learn the steps to remove crochet braids without damaging your natural hair.
Key takeaways:
- Clear a space with good lighting and plenty of room
- Use sharp scissors, wide-tooth comb, hair clips, spray bottle, and oil
- Divide hair into sections, start from the bottom, work in small sections
- Gently locate braid ends, look for thicker areas, use a mirror or ask a friend for help
- Cut the crochet braids, unloop and unravel, be patient and enjoy the process.
Preparing Your Work Area
Clear a space that offers good lighting and plenty of room for your tools and materials. Trust me, wrestling with tiny knots in the dark is like trying to find a needle in a haystack—blindfolded.
Lay down an old towel to catch stray hair clippings and product residue. Got long hair or really into snacks? Tie back that mane and limit the chips. No one wants greasy Dorito fingers on their scalp.
Place a mirror nearby, preferably one that can show the back of your head. You can also recruit a friend who owes you a favor from that time you helped them move a couch.
Lastly, keep some soothing music or your favorite podcast handy. The idea is to stay relaxed, not stress over tangles. You have a spa day, not a Herculean labor.
Gathering Necessary Tools
Sharp scissors or shears are your trusty companions here. A good pair makes cutting through synthetic hair a breeze. Remember, dull blades are about as useless as a chocolate teapot.
A wide-tooth comb is essential to help gently detangle your natural hair once the braids are removed. It’s like the knight in shining armor for your scalp.
Grab some hair clips or bands to keep sections of hair out of the way while you’re working. Trust me, you don’t want a rogue braid getting tangled with another.
A spray bottle filled with a water and conditioner mix can be your secret weapon. It helps to keep your natural hair moisturized and makes removing the braids simpler.
A little oil, such as coconut or olive oil, can come in handy. It will help to loosen any tight spots and make the unbraiding process smoother than a jazz saxophone solo.
Sectioning Your Hair
Divide your hair into manageable sections. This helps you focus on one area at a time, reducing the risk of cutting your natural hair. Use clips or hair ties to keep sections neat.
Start from the bottom and work your way up. Why? Because gravity is your friend, and it’s easier to handle loose ends rather than fight against a wild mane.
Work in small sections. This ensures you can see what you’re doing and keeps you from getting overwhelmed. Picture yourself as a crochet ninja, methodically tackling one braid at a time.
And there you have it—your hair’s team-building exercise is well underway!
Locating the Braid Ends
It’s time to channel your inner detective and locate those elusive braid ends. Here’s how to do it without making it feel like a treasure hunt:
First, gently run your fingers through the crochet braids to find where each individual braid ends and your natural hair begins. This might sound like a game, and it kind of is—except the prize is knot-free hair.
Once you’ve tracked down the braid ends, look for thicker areas. These are usually closer to where the braid is tied and looped through your hair.
If you’re feeling a bit like Sherlock Holmes and still can’t find them, try using a small mirror for a closer look. It’s not cheating; it’s being smart.
Finally, if you’re still struggling, get a friend involved. Four eyes are better than two, especially when it comes to your locks.
Cutting Crochet Braids
Time to wield those scissors with the precision of a ninja!
- Ensure you identify the spot where your natural hair ends and the crochet braid begins. Trust me, you don’t want an accidental impromptu haircut.
- Clip the ends several inches from your actual hair. Better safe than sorry; we’re aiming for a braid trim, not an avant-garde style statement.
- As you cut, keep your hand steady. A wobbly hand equals wonky results.
And voila, you’ve taken the first snip towards freeing your hair! Keep going, and remember, you’re one step closer to that liberating scalp massage.
Unlooping and Unraveling
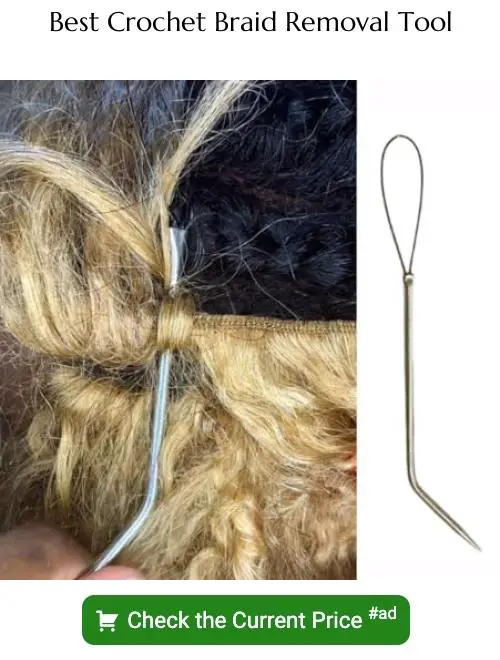
Now that you’ve cut the crochet braids, it’s time for some unlooping magic. Begin by gently finding the loop where your natural hair connects to the crochet hair.
Carefully slide the synthetic hair out of the loop. Think of it as unhooking a fish—minus the fish and the water, of course.
Once you’ve freed the loop, start unraveling the braid from the root to the ends. This part is like unraveling a mystery but a lot more satisfying.
Keep a spray bottle of water handy. A little spritz helps to ease out any tangles along the way.
Finally, take your sweet time with this process. No rush. Enjoy the meditative rhythm. Remember, patience is key.
Washing and Conditioning
Once all the crochet braids are out, it’s shampoo and conditioner time! Treat your hair like it’s just returned from a marathon. Sweaty and tangled.
First, use a clarifying shampoo to remove any product build-up. Imagine cleaning a spaghetti-pot after a food fight.
Next, condition like your hair’s life depends on it. Generously apply, and let it sit. This is your hair’s much-needed spa day.
Detangle with patience. Think of your hairbrush as a knight, and those knots as tiny tangled dragons. Slay them gently!
Rinse thoroughly and voila! Your hair is now free, fresh, and might even feel grateful enough to thank you.
