Learn the basic steps and tips for using a crochet hook effectively.
Ready to untangle the mysteries of the crochet hook? Dive into the crafty goodness with this all-in-one guide! We’ll explore every nook and cranny of your trusty crochet hook, from its anatomy to advanced techniques like Tunisian crochet. Whether you need help choosing the right size, mastering your grip, or making friends with yarn, we’ve got you covered. Time to get hooked on crochet!
Key takeaways:
- Know crochet hook anatomy for better understanding.
- Choose the right hook size for your project.
- Consider hook tip types for different uses.
- Try different grips to find what’s comfortable.
- Match yarn and hook sizes for best results.
Crochet Hook Anatomy
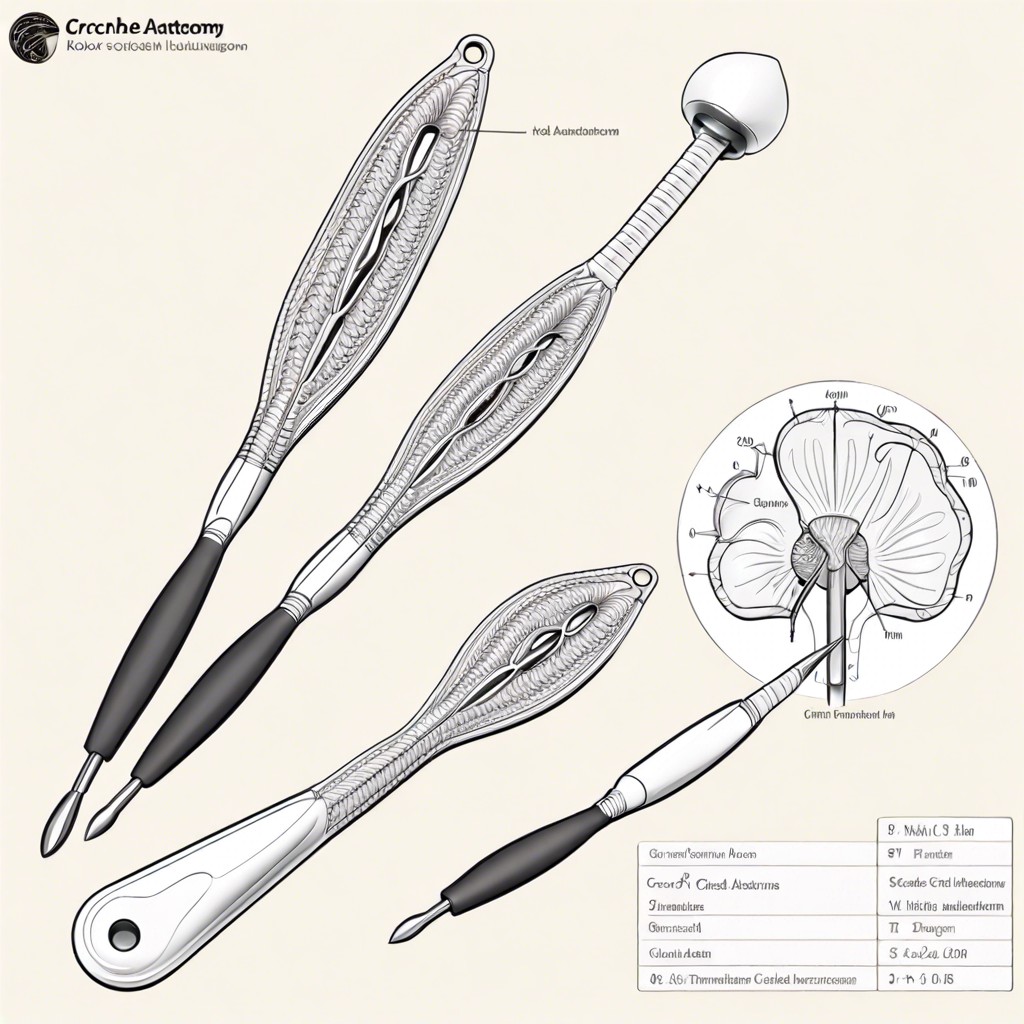
Let’s dissect the humble crochet hook. Think of it like a wand for yarn wizards.
First up, the pointy end. It’s called the “Head” and is responsible for grabbing the yarn and looping it through other stitches. Kinda like a tiny, dedicated grappling hook.
Next, we have the “Throat,” which is grooved to help guide the yarn smoothly. Imagine it like a mini slide for the yarn to glide down.
Further along, you’ll find the “Shaft.” It determines the size of your stitches. If the hook had a muscle, this would be it.
Then there’s the “Grip,” sometimes shaped or padded to prevent hand cramps. Your fingers will thank you.
Finally, we encounter the “Handle,” where all the magic happens, comfortably resting in your hand for hours of crochet fun.
Now that you understand your wand, you’re ready for the magic spells to come!
Types of Materials
Crochet hooks come in various materials, each bringing its own flair to your crocheting joyride.
Plastic hooks are lightweight and colorful, making them perfect for larger projects or if you want to feel like a knitting ninja. They’re budget-friendly but can sometimes bend under pressure.
Aluminum hooks are sturdy and smooth, allowing the yarn to glide effortlessly. They’re long-lasting, and their sleek nature can make you feel like you’re knitting with butter. Though not edible.
Wooden hooks, often made from bamboo or other woods, provide a warm, natural touch. They are eco-friendly and can be gentler on your hands. Wooden hooks are the Zen masters of the crochet world.
Steel hooks are ultra-slim and strong, ideal for delicate lace and fine thread work. They’re like the secret agents of crochet hooks—sleek, precise, and ready for any mission.
Each type of material has its quirks and perks, so don’t be afraid to try them all.
Hook Sizes
Crochet hooks come in a dizzying array of sizes. Fear not; this is not a ploy to confuse you. The size of a hook refers to its diameter, affecting the size of the stitches and the overall tension of your work.
- Metric System: Commonly used outside the USA, these sizes are in millimeters. You’ll find sizes like 2.0 mm, 3.5 mm, and 8.0 mm.
- Letter System: Predominant in the USA, these sizes range from B to Q. Think of it as a fun alphabet soup.
- Number System: Some manufacturers, just to keep us on our toes, use numbers. These can overlap with metric sizes, e.g., size 7 might be 4.5 mm.
For finer, more delicate work like lace, tiny hooks (B/1 or 2.25 mm) are ideal. Chunky, cozy blankets need hefty hooks (N/15 or 10 mm).
Remember, bigger isn’t always better. Scale your hook to the thickness of your yarn and desired stitch tightness. It’s like Goldilocks searching for the perfect porridge – find what’s just right.
Types of Tips
Some crochet hooks have pointy tips, while others are more rounded. The pointy tips make diving into stitches a cinch but can sometimes snag the yarn. Think of them as the ninjas of the crochet world. In contrast, rounded tips are gentler on your yarn and fingers, making them beginner-friendly, though they may require a bit more effort to insert into tighter stitches – let’s call them the teddy bears of crochet hooks.
Then we have inline hooks versus tapered hooks. Inline hooks sport a consistent width throughout the throat and head. They’re your go-to for maintaining even tension, giving your work that Goldilocks “just right” feeling. Tapered hooks, on the other hand, have a sleeker transition from throat to tip, offering more flexibility and speed but sometimes leading to uneven tension. They’re like the sports cars of hooks—brimming with excitement but requiring a steady hand.
Ultimately, the best choice depends on your personal preference and the type of yarn you’re using. Trying out different tips can be fun, like a tiny crochet adventure! Who knew choosing a hook could be as varied as picking your favorite candy at the store?
How to Hold a Crochet Hook
There are two main ways to hold a crochet hook: the knife grip and the pencil grip.
The knife grip: Hold the crochet hook as if you’re holding a dinner knife. Your thumb and index finger will grip around the handle, and your other fingers will rest comfortably behind.
The pencil grip: Hold the hook as if you’re wielding a pencil. Your thumb and index finger pinch the handle, while the hook rests on your middle finger.
Experiment with both grips to see which feels more natural. Some folks even create a hybrid grip that combines elements of both styles. Just remember, there are no crochet police—find what works for you!
Yarn and Hook Compatibility
Using the right hook and yarn combo is like finding your perfect dance partner. They need to move together in harmony. Going for chunky yarn? Think big and bold – larger hooks are your best friends here. Tiny, delicate yarns love smaller hooks. Too big a hook with a fine yarn and your work might look like lacy spaghetti. Too small a hook with bulky yarn? You’ll end up crocheting a stressful, tight mess.
Consider the yarn label – it often gives a recommended hook size. It’s not just for decoration, trust it. Twist and texture matter too. Smoother yarns glide like butter over the hook, while fluffy ones might need a touch more guidance.
When in doubt, swatch it out. A tiny test piece will save you from potential crochet heartbreak.
Starting Chains and Slipknots
First things first, slipknots! It’s like the secret handshake of the crochet world. Create a loop with your yarn, then pull the yarn through that loop. Tug gently to tighten it on your hook. Voilà, you’re in the club.
Next up, the starting chain. This foundational row is like setting up dominoes before the fun starts. Yarn over your hook and pull through the slip knot—there’s your first chain stitch. Repeat until you have a row long enough for your project. It’s as easy as binge-watching your favorite series.
If your work looks like a zigzag more than a straight line, don’t worry. It takes a bit of practice not to pull the yarn too tight or leave it too loose. Aim for Goldilocks tension—not too tight, not too loose, just right. Keep going and soon you’ll have a row as straight as a ruler.
Basic Stitches With a Crochet Hook
Let’s dive right into it.
First, the trusty chain stitch. It’s like the foundation of your crochet house. Wrap the yarn over the hook, pull it through the loop, and voilà—your first chain link.
Next, the single crochet. Insert the hook into the desired stitch, yarn over, pull through the loop, yarn over again, and pull through both loops on the hook. Look at you, mastering the basics already.
Now for the double crochet. Yarn over first, then insert the hook into the stitch. Yarn over, pull through, yarn over again, pull through two loops, yarn over one last time, and pull through the final two loops. It’s like a dance.
Half double crochet is a lovely middle ground. Yarn over, insert the hook, yarn over and pull through, but here’s the twist—yarn over, and pull through all three loops on the hook in one smooth motion. Feels efficient, doesn’t it?
There are more stitches out there, but these will arm you with what you need to get started on most patterns. Practice makes perfect, or at least less knotty!
Advanced Techniques (e.g., Tunisian Crochet)
Ready to level up? Let’s dive into some cool crochet tricks.
First up, Tunisian crochet. It’s like a magical blend of crocheting and knitting. You’ll need a special elongated hook, but fear not—it’s super fun.
Simply start by making a chain, as usual. Then, instead of finishing each stitch one at a time, you’ll keep pulling up loops across your row, ending up with a hook full of loops. Return back, stitching off the loops in a mesmerizing rhythm. It’s like playing a game of yarn Tetris!
For another advanced treat, try making bobble stitches. These puff up your project like popcorn. Crochet a series of half-done stitches in one spot, then stitch them together. Voila! Instant texture and flair.
Intricate lace patterns are another advanced delight. They require precision and patience but result in a jaw-dropping piece. Think of it as crochet’s answer to a Harry Potter spell: complex but seriously magical.
Feeling adventurous? Give tapestry crochet a whirl. This involves working with multiple colors at once, carrying yarn along the row. It’s like painting by numbers but with yarn.


