Learn how to single crochet into a chain with this step-by-step guide that promises to keep your yarn from tangling and your stress levels low.
Ah, the mighty single crochet! It’s the stitch that can transform a humble chain into glorious creations. If you’re on a quest to unravel the mysteries of crocheting into chains, you’re in the right amusement park. We’ll dive deep into the anatomy of those charming little loops and explore the wacky techniques of back bump and double-loop daring. With photo and video tutorials catering to both lefties and righties, you’ll be a chain-gang star. Have tension troubles? Fear not! We’ve got tips to keep your stitches in line and solutions for every hiccup on your crochet journey. Let’s turn those chains into art!
Key takeaways:
- Single crochet is fundamental for beginners.
- Understand chain stitch anatomy for successful projects.
- Crocheting into the back bump yields a polished edge.
- Maintain tension for uniform and neat stitches.
- Troubleshoot common issues for a smoother experience.
Understanding the Chain Stitch Anatomy
Picture this: the humble chain stitch, the skyscraper of the crochet world, is where it all begins. Each chain stitch resembles a series of tiny hearts, and understanding them is key to smooth sailing as you crochet.
Think of each chain as having three main parts: the front loop, the back loop, and, hidden like a shy turtle, the back bump.
The front loop faces you, waving hello. The back loop hangs behind, playing hard to get. And the back bump? It’s the ninja lurking underneath—the secret star for a smooth foundation.
By grasping these parts, you’re not just crocheting; you’re decoding the crochet Matrix. Remember, when next you chain, it’s not just yarn; it’s a journey!
Importance of Crocheting Into the Chain
Ah, the humble chain stitch. Often overlooked, yet it’s the backbone of many crochet projects. Why bother crocheting into it correctly, you ask? Well, consider it the foundation of a skyscraper. A shaky foundation might result in a wonky towel rather than that masterpiece of a scarf you envisioned. Let’s unpack the drama a bit.
Firstly, stability. The base row sets the stage for all that yarn goodness above it. Crocheting properly here ensures your Holy Grail—a uniform, sturdy fabric.
Second, aesthetics matter. A well-executed chain foundation creates neat edges. We all want our work to be the Beyoncé of crochet projects: flawless.
Lastly, your gauge depends on it. Get a little too creative with your chain technique, and your gauge might pull a disappearing act. A consistent approach keeps your measurements true to life and not figments of fantasy.
So, no pressure, but treat that chain like it’s your crochet project’s favorite pair of jeans—reliable, stylish, and holding everything together.
Preparing the Chain for Single Crochet
Alright, it’s time to set the stage! Before diving in with your hook, take a moment to get cozy with your chain. That little string of loops is about to become the backbone of your masterpiece.
First, keep your chain nice and tension-friendly, not too tight, not too loose. Think porridge at the bear family’s house—just right!
Next, identify the front and back of the chain. The front has a series of charming little V’s, while the back boasts a neat row of bumps. Remember, these bumps aren’t just for show; they’re the ticket to a cleaner edge if you crochet into them.
Lastly, embrace the sides. Know where your hook will dive in, and get comfortable spotting those two loops, or that elusive back bump, wherever your crochet adventure takes you. It’s all in the details, and with a little practice, you’ll be crocheting into chains like a yarn wizard!
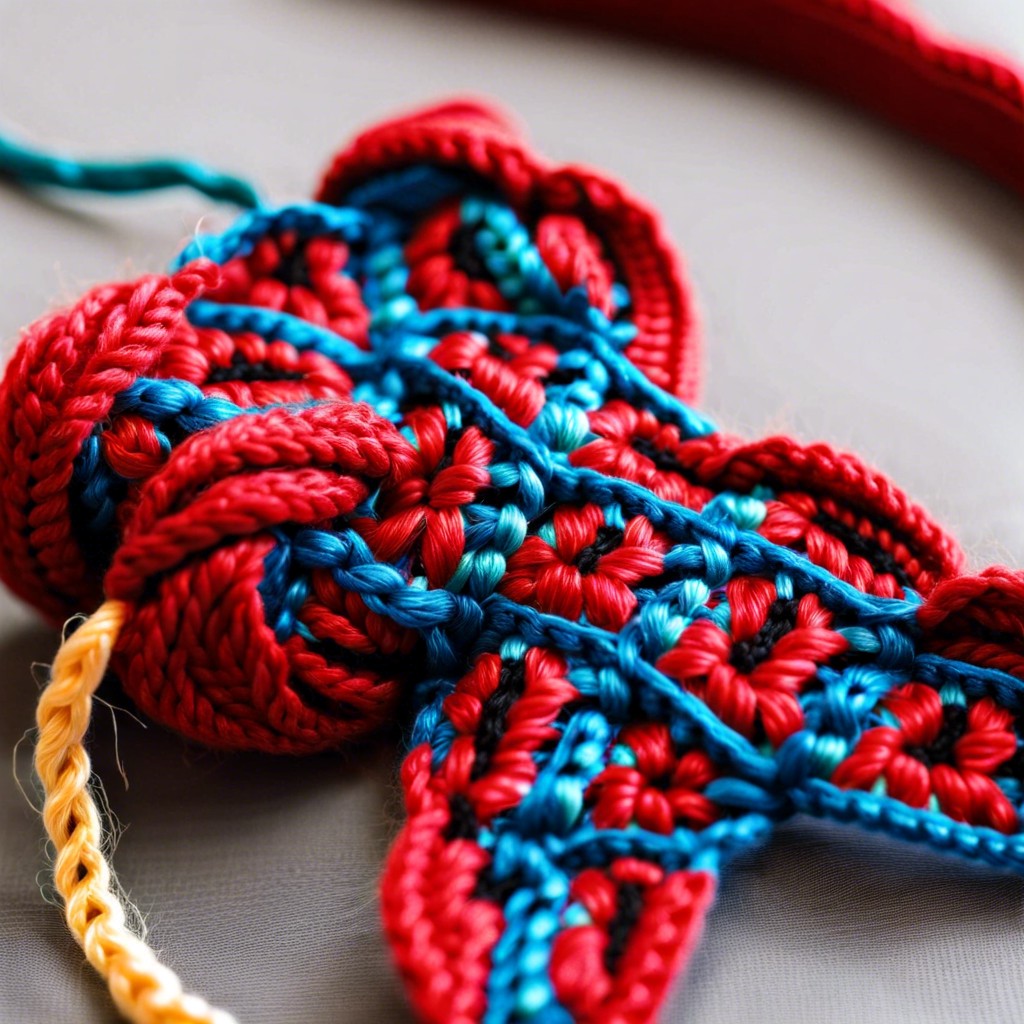
Crocheting Into the Back Bump
Imagine your crochet hook channeling its inner detective, snooping around the so-called “back bump” of the chain stitch. This back bump is like that secret club everyone wants to join, giving your project a polished, sturdy edge.
Here’s why you might want to consider this approach:
You get a smoother edge. The fabric looks neater than your grandma’s lace doilies.
The foundation chain remains as invisible as a ninja in the night, making your project look seamless.
Even better, it makes joining squares or strips later as easy as pie.
You’ll find that the backside of the chain suddenly becomes the cool side with its three-dimensional texture.
To pull this off:
Turn your chain so you’re face-to-face with those sneaky bumps running down the middle of your stitches.
Insert the hook into the back bump, pretending it’s the most obvious choice you ever made.
Yarn over, draw up a loop, yarn over again, and pull through both loops. Voilà. Magic.
Crocheting Under the Two Loops
When crocheting into a chain, inserting the hook under the two loops is a foundational technique. It offers a sturdy base for your project, much like a trusty sidekick.
Think of these two loops as a tiny hammock cradling your crochet hook—a snug fit for your comfort. This gives:
- A consistent appearance: Projects look uniform, like a marching band of ducks.
- Enhanced strength: Your creation won’t fall apart during Saturday night dance-offs.
- Easier counting: The chain remains distinguishable, preventing you from pulling out your hair.
Remember, it’s all about threading the loop-tastic needle with precision and pizzazz. Once you master this, you’re golden. Or woolen. Depending on your yarn choice.
Step-by-step Photo Tutorial
Grab your crochet hook, summon your yarn’s cooperation, and let’s dive into each step.
First, identify the loop known affectionately as the back bump. It’s the secret passage to a neater edge. Insert your hook into it. Voilà, your crochet starts looking classy.
Yarn over, because who doesn’t love yarn overs? Gently pull through that back bump. There’s no need to show off, just a gentle swoosh.
Now you have two lovebirds sitting on your hook: yarn over again and pull through both. This, my friend, is what we call a single crochet. Ah, the magic.
Repeat until your chain doesn’t know what hit it. Enjoy watching it transform as you liberally sprinkle some single crochet magic on it!
Right-handed Video Tutorial
Grab your hook and yarn, and let’s dive into the world of right-handed crocheting! Watching a video can be like having a magical crochet fairy whispering sweet nothings into your stitches.
- Start by holding your yarn and hook correctly—no death grips, please! We’re crocheting, not wrestling an octopus.
- Keep your tension even. Pretend the yarn is a delicate spaghetti strand—it can’t be too tight or too loose.
- Place the hook through the chain’s back bump or under the two loops, depending on your desired look.
- Bring the yarn over the hook, like offering it a cozy scarf.
- Pull through to create your first single crochet stitch, marvel at its charm, and repeat.
Dive into the video, and soon you’ll be crocheting as effortlessly as you breathe, minus any tangles!
Left-handed Video Tutorial
Fear not, left-handed crocheters! Though the crochet world sometimes feels like it favors the righties, help has arrived. With a little twist (literally), you can master the art of single crochet into the chain with a trusty video guide.
- Mirror the technique: The video shows the process as it applies to left-handers—no need to flip your screen or stand upside down. Just mimic the movements, and you’ll be set.
- Yarn and hook in harmony: See precisely how the yarn flows over the hook, avoiding that pesky yarn-split that haunts your crochet dreams.
- Practice makes perfect: Pause, rewind, and practice at your own pace. Unlike your cousin’s pancake flip, you don’t need to perfect this in one take.
- Troubleshooting insights: The video points out common pitfalls. Who knew a simple twist could cause such a tangled dance?
With these points in mind, grab your hook and embrace the quirky charm of left-handed crocheting!
Tips for Maintaining Tension
Think of tension as the not-too-tight, not-too-loose Goldilocks zone of crocheting. It helps keep your stitches uniform and your projects spiffy.
Hold your yarn as if it were spaghetti—firm enough that it doesn’t escape but gentle enough that it doesn’t snap in two.
Use your non-dominant hand as the crochet project’s bouncer. Wrap the yarn around your fingers in a way that doesn’t lead to hand yoga.
Experiment with different finger positions until the yarn flows like a well-oiled gravy train. Whatever feels comfortable for you is perfect; we’re not judging hand acrobatics here.
Keep an eye on your loops. If they’re tighter than your favorite jeans after Thanksgiving dinner, ease up. Looser than a goose on the weekend? Reel it in.
Remember, practice may not make perfect immediately, but it will certainly make your tension consistent. Keep calm and crochet on!
Troubleshooting Common Issues
Chains getting too tight? Loosen up! Keep a relaxed grip and use a bigger hook if necessary. If your chain stitches are tighter than a pair of skinny jeans after a holiday feast, it’s a clear SOS to adjust your tension.
Uneven edges can take a hike by counting your stitches regularly. Missing your bus is understandable, but missing stitches? Unforgivable.
Got a twist in your chain? Straighten it out, detective. Always ensure it isn’t twisting before you crochet into it. There’s no need for a surprise loop-the-loop.
Painful wrangling with yarn color changes? Remember, patience is key—and maybe some cookies for comfort. Keep color changes crisp by practicing before the final masterpiece.
When life gives you yarn tangles, channel your inner relaxation guru—breathe and untangle patiently. Calm hands, happy yarn. Craft another day!


