Learn how to block your granny squares to make them look neat, uniform, and professional.
Key takeaways:
- Blocking transforms granny squares from wonky to wonderful.
- It involves wetting or steaming squares and pinning them into shape.
- Blocking ensures squares match up perfectly for easy assembly.
- Supplies needed for blocking acrylic yarn include foam mat and pins.
- Steam can be used to tame unruly granny squares.
What Is Blocking?
Blocking is like giving your granny squares a spa day. It’s a magic trick that transforms your crochet pieces from wonky to wonderful. Here’s the scoop:
When you block, you essentially reshape your squares, making them look more polished and even. Think of it as giving them a little haircut and a good press.
The process involves wetting or steaming your squares and then pinning them into shape on a flat surface. This allows the fibers to relax and settle into their new positions.
Imagine your granny squares all uniform and straight, ready to become part of a flawless blanket. Blocking helps ensure that each square matches up perfectly with its neighbors, making assembly a breeze.
It works wonders on various yarns, though the methods might differ slightly. It’s essential for natural fibers like wool, but even acrylic can benefit.
This simple step enhances your project’s overall look and feel, giving it a professional finish. So, roll up those sleeves and prep your squares for their mini-makeover.
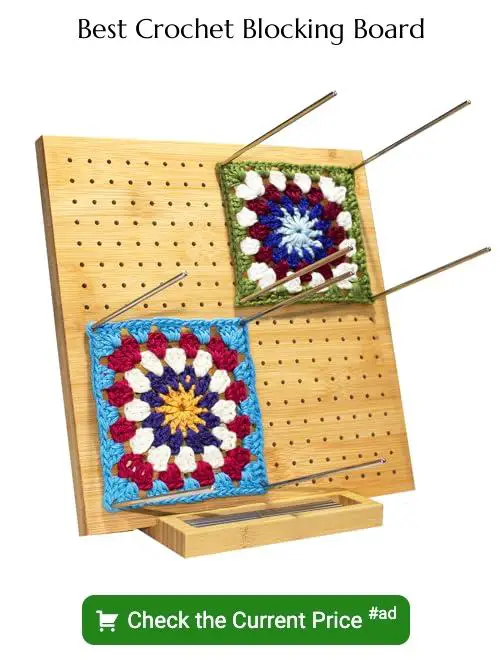
Blocking Supplies for Acrylic Yarn
Let’s turn our attention to what’s needed for blocking. If you’re working with acrylic yarn, you’ll find this rather straightforward. Gather these items:
First, a foam blocking mat or an old yoga mat will serve you well. Next, T-pins or rust-proof pins are critical. Think of them as little soldiers standing guard over your masterpiece.
A spray bottle filled with water or a mild, no-rinse fiber wash mixed with water will do the trick. The water should be cool, not ice-cold, unless you enjoy torturing your fingers.
You might also want a measuring tape or ruler to ensure your granny squares get a nice even stretch, avoiding the wibbly-wobblies. Lastly, a fan can speed up the drying process, but it’s an optional luxury for the impatient souls among us.
Gather these few essentials and you’ll be ready to transform those granny squares from crinkled chaos into tidy treasures.
How to Block Granny Squares Step-by-Step Tutorial
Begin by soaking your granny squares in lukewarm water mixed with a drop of mild detergent. Gently squeeze out excess water—don’t wring them out. Lay out some towels and place the squares on them to blot out more moisture.
Next, grab your blocking mats. Pin each corner of the square on the mats using rust-proof pins. It’s like giving your squares little acupuncture treatments. No pain, all gain! Make sure they’re pulled into shape, but don’t overstretch them unless you want wonky squares.
Use a spray bottle to mist the squares with water, making them evenly damp again. Then let them dry completely. Patience, my friend. It’s like waiting for a cake to bake, but with yarn. Once dry, unpin them, and admire those perfectly squared masterpieces.
Voilà, your granny squares are now blocked and ready to join forces in whatever crocheting adventure awaits them.
Can You Use Steam To Block Granny Squares?
Absolutely, steam can be your best friend in taming those unruly granny squares. Here’s how:
Wave Your Magic Wand – Your iron, that is. Set it to the steam setting, but never go full contact. Hover the iron an inch above the square and let the steam work its sorcery.
Be Gentle, Dear – Avoid pressing down. Too much pressure and your square will look like it’s been run over by a truck. Hovering is key!
You Can Spook It With a Towel – Lay a damp cloth over your square and steam through it. It’s like an undercover operation; sneaky but highly effective.
Quick Dry Dance – After steaming, give your square a little pat and let it cool. This sets the shape and keeps it from reverting to its rebellious ways.
Steam away, and those squares will fall in line, looking sharp and snazzy, just like a freshly ironed shirt!
Should You Block Granny Squares Before Joining Them?
Absolutely! Blocking your granny squares before joining them can make your project look polished and professional. Here are some reasons why:
First off, blocking ensures that each square is uniform in size and shape. This makes the joining process much smoother and less frustrating. No more trying to force mismatched squares to play nice.
Blocked squares lie flat and their edges are straight, so seam lines look neat and even. It’s like ironing your shirt before a job interview. You can spot the difference a mile away.
Have you ever joined unblocked squares only to discover a random, wonky square sticking out like a sore thumb? Blocking can save you from that heartbreak.
Lastly, blocking can make your life easier later. When your squares are already behaving, your final wash and block of the entire project will be a piece of cake. Or at least a piece of something more enjoyable than wrestling asymmetrical granny squares.
So, grab those pins and that blocking mat. Your future self will thank you.


