Learn how to crochet stuffed animals with this step-by-step guide on creating adorable plush toys from yarn.
Key takeaways:
- Choose the right yarn and colors for your stuffed animal.
- Arm yourself with essential crochet tools and supplies.
- Learn and master basic stitches used in amigurumi.
- Familiarize yourself with tips on reading amigurumi patterns.
- Start with simple shapes and beginner-friendly patterns.
Choosing the Right Yarn and Colors
Selecting yarn for crocheting stuffed animals, or amigurumi, is key to making your project pop. Cotton or acrylic yarns are ideal due to their durability and ease of care. Look for smooth, not fuzzy, textures to make the stitches more visible and your work neater.
When you pick colors, think about the character or animal you’re creating. Vibrant colors can bring energy and fun to playful creatures, while natural tones suit animals like bears or elephants perfectly. Don’t shy away from experimenting with bold or contrasting colors for small details like eyes or accessories, enhancing the personality of your creation.
Using a consistent yarn thickness throughout the project helps maintain uniformity in your stitches, making your finished stuffed animal look polished and professional.
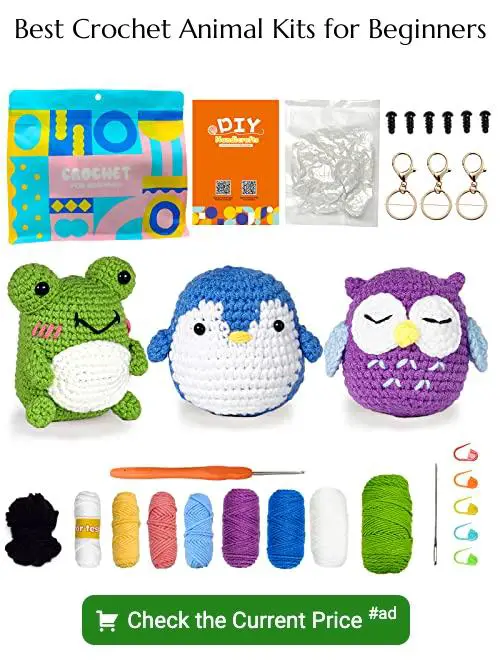
Essential Crochet Tools and Supplies
For your foray into crocheting stuffed animals, arm yourself with the right tools to turn yarn into cuddly creations. A crochet hook is your primary instrument; sizes range generally from 2.5 to 5 mm depending on yarn thickness. Soft-grip handles enhance comfort during long crafting sessions.
A stitch marker is invaluable to keep track of rounds when creating your animal. These are especially useful as most stuffed animals are worked in continuous rounds rather than joined ones.
Scissors will always be at your side for snipping yarn ends, and a yarn needle is crucial for assembling parts and weaving in ends. Opt for a blunt tip to avoid splitting the yarn during sewing.
Lastly, consider stuffing for giving shape to your project. Polyester fiberfill is popular, hypoallergenic, and washable, making it ideal for toys. Having these essentials at hand will make the process smoother and more enjoyable.
Basic Stitches Used in Amigurumi
Amigurumi creations primarily depend on a few simple crochet stitches, making this craft accessible for beginners.
Firstly, the magic ring, also known as the adjustable ring, is the foundational start for most stuffed animals. This technique allows you to pull the center tightly closed, avoiding any gaping holes at the start of your project.
Single crochet (sc) is the most commonly used stitch in amigurumi. It creates a tight, dense fabric that helps keep the stuffing inside and gives your creature a smooth, uniform texture.
An increase (inc) stitch is simply two single crochets into the same stitch. This is essential for shaping your amigurumi, allowing the piece to expand gradually.
A decrease (dec) involves crocheting two stitches together. It is used to taper parts of your stuffed animal, such as the top of the head or the ends of limbs.
Slip stitch (sl st) is often used to finish off a piece, joining stitches together seamlessly without adding height.
Master these stitches and you’ll be shaping snuggly critters in no time!
Tips On Reading Amigurumi Patterns
Amigurumi patterns often use certain shorthand that might initially seem like a secret code. Familiarizing yourself with common abbreviations will smooth your crafting journey. Sc stands for single crochet, inc means increase, and dec indicates decrease. You’ll see these often as they form the basis of shaping your adorable critter.
Patterns also specify rounds rather than rows because amigurumi is typically worked in a spiral. This method helps avoid visible seams, giving your stuffed animal a smoother appearance. Make sure to use a stitch marker at the beginning of each round to keep your place.
Gauge isn’t critical in amigurumi as it is in garment crocheting, but consistent tension is key. If your stitches are too loose, the filling might show through. Practice maintaining an even tightness that’s snug enough to keep the stuffing inside but not so tight that it distorts the stitches.
Lastly, don’t rush the process of learning to read these patterns. Like learning any new language, it takes a bit of practice, but once you get the hang of it, a whole new world of cute and quirky creations awaits.
Best Beginners Patterns to Try
Starting with simple shapes is a stellar way to ease into crocheting stuffed animals. Consider patterns such as spheres, cubes, or basic animal shapes like a teddy bear or a bunny. These forms allow you to practice and perfect your stitching and stuffing techniques before advancing to more intricate designs.
Look for patterns that have a lot of positive feedback or those that come with step-by-step instructions and photos. This visual aid can be incredibly helpful as you’re learning to interpret crochet patterns correctly.
A great project for beginners is a small crocheted cat or dog. These usually require fewer color changes and consist of simpler shapes, making the construction process less overwhelming. Plus, they’re absolutely adorable!
Always start with a project that feels manageable. Completing it will give you a boost of confidence and inspire you to take on more challenging projects. Remember, every pro was once a beginner—take your time to enjoy the journey.
Related Posts
 Easy Crochet Gnome Pattern Free: Transform Yarn into Whimsical Friends
 Crochet Star Blanket: A Stellar DIY Guide
 How to Crochet Slippers for Beginners Step by Step with Pictures: Cozy Feet Awaits
 Adjustable Ring Crochet: Master the Magic Circle
 How to Crochet Without a Hook: Hands-On Creativity