Discover the world of crochet knots as we unravel various techniques and styles to enhance your crafting skills in this informative blog post.
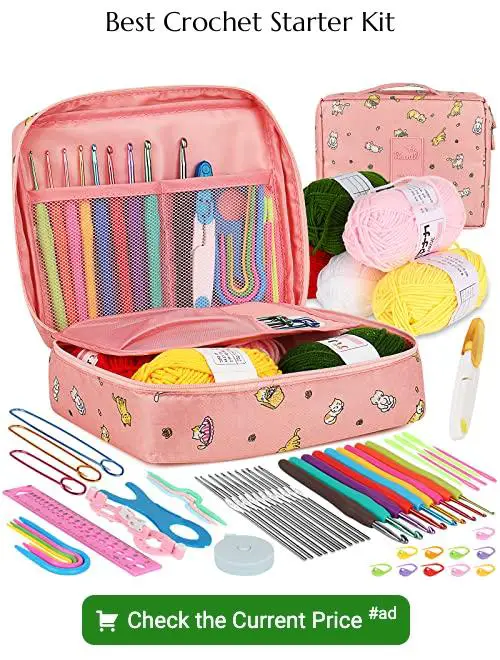
Crochet is a popular craft that has been around for centuries. It involves using a hook and yarn to create beautiful designs and patterns.
One of the most important aspects of crochet is learning the different types of knots that are used in the craft. These knots are what hold everything together and create the structure of your project.
In this blog, we will be exploring the various types of crochet knots, from basic to advanced, so you can improve your skills and take your crocheting to new heights! Whether you’re a beginner or an experienced crocheter, there’s always something new to learn about this fascinating craft. So grab your hook and let’s get started!
Slip Knot
The slip knot is the foundation of any crochet project. It’s a simple knot that creates a loop at the end of your yarn, which you can then use to start your first chain stitch.
To make a slip knot, take one end of your yarn and create a small loop with it. Then, take the other end and pass it through the loop from behind.
Pull both ends gently to tighten the knot around your hook.
It’s important to note that while making this initial slipknot may seem like an easy task for experienced crocheters, beginners might find themselves struggling with getting their tension right or even creating too tight knots.
Chain Stitch
It’s a simple yet essential stitch that creates a series of loops, which are then used to build upon for more complex stitches. To create a chain stitch, you’ll need to start with a slip knot on your hook and then pull yarn through the loop on your hook in one fluid motion.
Once you’ve mastered the basic technique, there are many variations of this versatile stitch that can be used to add texture and interest to your projects. For example, working into only one loop or both loops can change how tight or loose the resulting fabric will be.
Chain stitches also serve as an important element in creating shapes such as circles and squares by joining them together at their ends using slip stitches or other techniques.
Single Crochet
It creates a tight, dense fabric that is perfect for items like dishcloths, potholders, and even garments. To create a single crochet stitch, you will need to start with a foundation chain (which we covered in our previous section on Chain Stitch).
Once you have your foundation chain ready to go, insert your hook into the second chain from the hook.
Next, yarn over (wrap the yarn around your hook) and pull up a loop through both loops on your hook. You should now have two loops on your hook again.
Yarn over once more and pull through both loops on the hook.
Congratulations! You’ve just completed one single crochet stitch! Continue working this same pattern across each chain until you reach the end of your row or project.
Half Double Crochet
It creates a dense fabric with more texture than single crochet but less drape than double crochet. To work this stitch, you will need to know how to chain and yarn over.
To begin, make a foundation chain of any length. Then, yarn over once before inserting your hook into the third chain from the hook (the first two chains count as your first half double crochet).
Yarn over again and pull up a loop (you should have three loops on your hook). Yarn over once more and pull through all three loops on your hook.
Repeat this process in each subsequent stitch across the row until you reach the end. When working subsequent rows in half double crochets, remember to start with two chains before turning your work.
Double Crochet
It’s a versatile stitch that can be used for a variety of projects, from blankets to scarves and everything in between. To create this stitch, you’ll need to start with a foundation chain and then work into each chain across the row.
To begin, yarn over your hook once before inserting it into the fourth chain from your hook (this counts as your first double crochet). Yarn over again and pull through two loops on your hook.
Then yarn over again and pull through two more loops on your hook.
Repeat this process across the row until you reach the end. When working back across subsequent rows, make sure to turn at the end of each row by chaining three before beginning another set of double crochets.
Treble Crochet
It’s a taller stitch than the double and single crochet stitches and creates an open fabric with lots of drape. To make this stitch, you’ll need to yarn over twice before inserting your hook into the designated stitch.
Once you have inserted your hook into the correct spot, yarn over again and pull through two loops on your hook. Repeat this step twice more until there are only two loops left on your hook.
The treble crochet is great for creating lacy patterns or adding texture to blankets or scarves. You can use it alone or combine it with other stitches like single crochets for added interest.
Double Treble Crochet
It creates a tall and airy fabric that’s perfect for shawls or blankets. To make this stitch, you’ll need to yarn over your hook four times before inserting it into the designated stitch.
While it may seem intimidating at first glance, mastering this technique can take your crocheting skills to new heights! However, if you’re just starting out with crochet or are still getting comfortable with basic stitches like single and double crochet – don’t worry! Double treble crochet is an advanced technique that requires practice and patience.
Crochet Increases
Crochet increases are used to add more stitches into a row or round, creating a wider and fuller shape. There are several ways to increase in crochet, including the single crochet increase (sc inc), half double crochet increase (hdc inc), double crochet increase (dc inc) and treble stitch increases.
The most common type of increase is the single crochet increase which involves working two single crochets into one stitch. This creates an extra stitch while maintaining the same number of stitches per row or round.
Another popular method for increasing is using half-double crochets where two hdc’s are worked into one stitch resulting in an additional loop on your hook.
Double and treble crochets can also be increased by working multiple loops through one existing loop on previous rows/rounds respectively.
Crochet Decreases
It involves reducing the number of stitches in a row or round, creating a tapered effect. There are several ways to decrease in crochet, including single crochet decrease (sc2tog), half double crochet decrease (hdc2tog), and double crochet decrease (dc2tog).
Each method creates a slightly different look and can be used for various projects.
Single Crochet Decrease:.
The single crochet decrease is one of the most common methods used by crocheters. To work this stitch, insert your hook into the first stitch, yarn over and pull up a loop.
Then insert your hook into the next stitch, yarn over again and pull up another loop. You should now have three loops on your hook; yarn over once more and draw through all three loops.
Half Double Crochet Decrease:.
The half double crochet decreases two stitches at once but maintains height better than other decreasing techniques like sc2tog or dc2tog which makes it ideal for certain patterns where you want less bulkiness while still maintaining some height. To work this stitch start with yarning over then inserting through both loops of first stich ,yarnover again then go through both toploops of second stich,yarnover again,pullthrough all 3loops on hook.
Double Crochet Decrease:.
This method reduces two stitches at once just like hdc but has even more height than hdc making it perfect when working with taller stitches such as treble crochets.To make this type,start by yarning-over before inserting into first stich,yarn-over,pulluploop,next insertinto secondstitch,yarn-over,pulluploopagain.Now you will have 3loopsonyourhook,YOandpullthroughfirsttwo,andthenYOandpullthroughtwo remaining ones.
Crocheting decreases may seem intimidating at first, but with practice and patience, you’ll be able to master this technique in no time.
Slip Stitch
It’s a simple stitch that involves inserting your hook into the next stitch, wrapping the yarn around it, and pulling it through both loops on your hook. Slip stitches are also great for creating texture in your work or for making small adjustments to a pattern.
To create slip stitches, start by chaining a few stitches as per instructions in your pattern. Then insert your hook into the second chain from the hook (or as instructed), wrap yarn over it and pull through both loops on your needle.
One thing to keep in mind when working with slip stitches is that they tend to be tighter than other types of crochet knots. This can make them difficult to work with if you’re not used to them but practice makes perfect! With time you will get comfortable using this knot.
Moss Stitch
It’s also known as the granite or linen stitch and is perfect for creating scarves, blankets, and other cozy items. This simple yet elegant stitch involves alternating single crochets and chain stitches to create a pattern that resembles tiny little squares.
To work the moss stitch, you’ll need to start with an even number of chains. Then you’ll work your first row by placing one single crochet in the second chain from your hook followed by one chain skip next ch space then place another sc in next ch space; repeat this pattern across until end of row.
For subsequent rows: Chain 1 turn (this counts as first sc), *sc into previous row’s skipped st (the “chain” between two scs) then make 1ch*, repeat from *to* till last st., place final sc into turning-chain-space at end of previous round.
Repeat this process for each new row until you reach your desired length or complete project.
Granny Stripe Stitch
It’s a versatile stitch that can be used to create blankets, scarves, and even clothing items like sweaters and cardigans. The beauty of this stitch lies in its simplicity – it’s made up of just two basic stitches: the double crochet and the chain stitch.
To create the Granny Stripe Stitch, you’ll need to start with a foundation chain of any length. Then, work one row of double crochets into each chain across.
For the second row (and all subsequent rows), you’ll work three chains at the beginning as your first double crochet (this counts as your first dc). Then skip two stitches from previous row below and make 3dc in next st; *skip 2 sts from previous row below then make 3dc in next st* repeat ** until end.
Repeat these steps until your project reaches its desired length or width! You can use multiple colors to give it an ombre effect or stick with one color for a more traditional look.
Elizabeth Stitch
It’s named after Queen Elizabeth I, who was known for her love of lace and embroidery. This stitch involves working clusters of double crochets together to create the unique texture.
To work the Elizabeth Stitch, you’ll need to know how to chain stitch and double crochet. Start by chaining an even number of stitches for your foundation row.
Then, skip the first two chains and work one double crochet into each remaining chain across.
For Row 2 (and all even-numbered rows), start by chaining three (this counts as your first double crochet). Then *skip one stitch, work 1 DC in next st; ch-1*.
Repeat from *to* until you reach the end of the row.
For Row 3 (and all odd-numbered rows), start by chaining four (this counts as your first DC plus ch-1). Then *work cluster in next ch-1 sp; ch-1*.
Repeat from *to* until you reach last st., then make one more DC into top turning chain space at end. Repeat Rows 2 & 3 alternately until desired length is reached.
Star Stitch
It’s perfect for adding texture to your projects, such as blankets, scarves, or even hats. This stitch may look complicated at first glance but once you get the hang of it, it’s actually quite easy to do.
To create the star stitch, you will need to know how to make single crochets (sc), half double crochets (hdc), and double crochets (dc). The basic idea behind this stitch is that you work multiple stitches into one loop or space in order to create the “star” shape.
Start by chaining an even number of stitches plus 1 extra chain for turning purposes. Then insert your hook into the second chain from your hook and pull up a loop.
Repeat this step until there are six loops on your hook.
Next comes what makes this stitch so special: yarn over and pull through all six loops on your hook at once! Chain one – congratulations! You’ve just made one star!.
Continue working across each row in multiples of two until you reach the end of each row then turn around again with another chain before starting another row.
Puff Stitch
This stitch creates a raised, fluffy cluster of loops that can be used in various ways, such as creating flowers or adding detail to blankets or scarves.
To create the puff stitch, you will need to work multiple yarn overs into one stitch before pulling through all the loops on your hook. The number of yarn overs will determine how large and puffy your cluster will be.
This technique may seem intimidating at first but with practice, it becomes easier. Once you get the hang of it, you’ll find yourself incorporating this versatile stitch into many different patterns.
Shell Stitch
It’s made up of multiple stitches worked into the same space, creating a shell-like shape. This stitch is perfect for adding texture and dimension to your projects, whether you’re making blankets, scarves or even clothing.
To work the shell stitch, start by chaining an even number of stitches. Then work one double crochet into the fourth chain from your hook.
Skip two chains and then work five double crochets into the next chain. Skip two more chains and repeat this pattern until you reach the end of your row.
For subsequent rows, start by chaining three (which counts as one double crochet) then turn your work around so that you are working back across in the opposite direction from where you started.
Work one double crochet in each of the first two stitches (the top loops only), skip over three stitches (including those used for turning), then make five double crochets all in once space – this will form another “shell”. Continue repeating this pattern until reaching end-of-row again.
Primrose Stitch
It’s perfect for creating blankets, scarves, and other cozy accessories. This stitch involves working clusters of double crochets into chain spaces to create the petal-like effect of primroses.
To work the Primrose Stitch, you’ll need to know how to chain stitch and double crochet. Start by chaining an even number of stitches plus two extra chains for turning purposes.
Then skip the first two chains from your hook and work one double crochet in each remaining chain across.
Next, turn your work over and begin row 2 by chaining three (this counts as your first double crochet). *Skip the next stitch, then make five dc in the next st (this forms one cluster)* Repeat this pattern until you reach end-of-row; finish with a dc on top of ch-3 from previous row.
Repeat Row 2 until desired length is achieved.
Cluster Stitch
It involves working multiple stitches into the same stitch or space, creating a “cluster” of stitches. This technique can be used in various ways, such as creating raised bumps on the surface of your work or forming intricate patterns.
To create a basic cluster stitch, you will need to work several double crochets (or other stitches) into one stitch or space before completing them all at once. The number of stitches worked together will depend on the pattern you are following.
One popular way to use this technique is by alternating clusters with rows of single crochet for an interesting textured effect. You could also try using different colors for each row of clusters to create stripes in your project.
Lemon Peel Stitch
It’s perfect for creating blankets, scarves, and other cozy items. This stitch involves alternating between single crochet and double crochet stitches in the same row to create a bumpy texture that resembles lemon peel.
To work this stitch, start by chaining an even number of stitches. Then, single crochet into the second chain from your hook and continue across the row with alternating single crochets and double crochets until you reach the end of your chain.
For subsequent rows, alternate where you begin with either a single or double crochet so that they are staggered from one another. Repeat this pattern until you have reached your desired length.
The Lemon Peel Stitch is easy to learn but adds depth to any project it’s used in.
Popcorn Stitch
This stitch creates little bobbles that pop out from the fabric, giving it a unique look and feel. To make this stitch, you will work several double crochets into the same stitch or space, then pull up a loop through all of them at once.
One great thing about the popcorn stitch is that it can be used in many different ways. You can use it as an accent on hats or scarves, create rows of popcorn stitches for blankets or afghans, or even use them as flower petals in amigurumi projects.
To make a basic popcorn stitch:.
- Work 4 double crochets into the same st (or ch-sp) indicated.
- Remove hook from working loop.
- Insert hook front-to-back under top two loops of first dc made; pick up working loop dropped before by pulling through st with new color if desired; pull this new color yarn tail tight so knot forms snugly around post just worked over.
- Insert hook back-to-front under both loops at top of last dc made; draw working lp through these 2 lps on hk
- Ch-1
Repeat steps 1-5 across row until complete!.
Waistcoat Stitch
This stitch resembles the look of knitting but is actually crocheted. It’s perfect for creating warm and cozy projects like scarves, hats, blankets or even sweaters.
To create this beautiful pattern you will need to work into the center of each previous row instead of working into both loops on top like in traditional crochet stitches. The result is a tight-knit appearance with little to no gaps between stitches.
One great thing about this technique is that it works up quickly due to its compact nature which makes it ideal for larger projects where time may be an issue.
V-Stitch
It gets its name from the way it looks, with two “V” shapes next to each other. This stitch is created by working two double crochets into the same space, then chaining one and working another set of double crochets into the same space.
One of the great things about this stitch is that it creates an open and lacy fabric, making it perfect for lightweight scarves or shawls. You can also use thicker yarns to create cozy blankets or afghans.
To work a V-stitch, you’ll need to know how to chain and double crochet. Start by chaining an even number of stitches for your foundation row (for example 20).
Then skip three chains from your hook (these will count as your first double crochet) and work one more double crochet in the fourth chain from your hook.
Next, chain one stitch before skipping over two chains on either side of where you just worked those last two stitches together; then make another set consisting of 2 dc’s + ch1 + 2dc’s all in that skipped-over third chain. Repeat this pattern across until there are only three chains left at end; skip over next-to-last-chain & place final dc into very last stich which should be turning-chained up at start.
V Double Crochet Stitch
This stitch is perfect for adding depth and dimension to your projects, especially when used in combination with other stitches.
To create the V Double Crochet Stitch, start by making a foundation chain of any length. Then, yarn over your hook twice before inserting it into the third chain from your hook.
Yarn over again and pull through two loops on your hook (you should have three loops remaining). Yarn over once more and insert back into the same stitch as before.
Yarn over again and pull through two loops on your hook (four loops remaining). Yarn over one last time and pull through all four remaining loops.
Repeat this process across each row until you reach the end of your project or desired length.
This versatile stitch can be used in many different ways such as creating textured blankets or scarves with alternating rows of single crochet stitches for added contrast.
Side Saddle Stitch
It’s perfect for adding some interest to your projects, especially if you’re looking for something different from the usual stitches. This stitch involves working into the side of the previous row instead of the top loops, which gives it its distinctive look.
To create this stitch, start by making a foundation chain in multiples of two plus one. Then work one single crochet into each chain across and turn your work.
For Row 2, skip the first single crochet and make one half double crochet in each remaining single crochet across until you reach the end.
Now comes time to create our Side Saddle Stitch! Chain 1 and turn your work again before making one slip stitch into both loops at once on top of first half double crochets from Row 2 (the skipped ones). Next up is another half double crochets worked as normal but only through back loop only (BLO) on next hdc from Row 2; repeat these steps alternately till last stiches where we will finish with an hdc through both loops at once.
Repeat Rows Two onwards until desired length has been achieved or according to pattern instructions.
Picot Stitch
It’s often used as an edging or border and can be worked in various sizes depending on the desired effect. To create this stitch, you’ll need to chain a few stitches, then slip stitch into the first chain to form a loop.
Next, single crochet into the loop and chain one before repeating the process.
One of the great things about using picot stitches is that they’re incredibly versatile – you can use them in almost any pattern or design! They add texture and interest without being too overwhelming or distracting from other elements of your work.
If you’re new to crocheting with picots, it’s best to start with smaller loops until you get comfortable with how they look and feel. Once you’ve mastered this technique, try experimenting by combining different colors or yarn weights for even more creative possibilities!
Picot Single Crochet
It’s perfect for creating edging on blankets, scarves, and other items. This stitch involves making a small loop or picot at the top of each single crochet stitch.
To create this stitch, you will need to know how to make a single crochet (sc) and chain (ch). Start by making one sc in the first st of your row.
Then ch 3 and sl st into the first ch made (this creates your picot). Next, make another sc in the same st as before.
Repeat this pattern across your row until you reach the end. The result is an elegant edge with evenly spaced loops that add texture and interest to any project.
Aligned Cobble Stitch
It’s perfect for creating blankets, scarves, and other cozy items. This stitch involves working clusters of double crochets in the same space to create raised bumps or “cobbles” on your fabric.
To work this stitch, you’ll need to know how to chain and double crochet. Start by chaining an even number of stitches for your foundation row.
Then, skip the first two chains and work one double crochet into each remaining chain across.
For the next row, start by chaining three (this counts as your first double crochet). Then skip the next stitch and work *one cluster (3 dc) into the next st; ch 1; skip 1 st*.
Repeat from *to* until you reach last two stitches then make one dc in each of them. Repeat this second row until you have reached your desired length.
Front Post Stitch
It involves working around the post of the stitch instead of through the top loops, which gives it its unique look. This stitch can be used to create ribbing, cables, and other interesting designs.
To work a front post double crochet (FPdc), you will need to insert your hook from front to back between the posts of two stitches in the previous row. Then bring your hook up and over one side of that same post before completing a double crochet as usual.
This technique may seem tricky at first but with practice, you’ll find it easy to master! The result is worth it – an impressive textured fabric perfect for scarves or blankets.
Experiment with different yarns and colors when practicing this stitch; some yarns will highlight this texture better than others. You can also try combining FPdc with other stitches like single crochets or treble crochets for even more variety in your projects!
Back Post Stitch
It’s an intermediate-level stitch that involves working around the post of the previous row’s stitches, rather than through the top loops as you would with regular stitches.
To work a back post double crochet (BPdc), insert your hook from behind into the space between two posts of the previous row, then bring it up and over to complete a double crochet as usual. This will cause your new stitch to wrap around and sit behind (or “post”) its corresponding stitch from below, creating an interesting ribbed effect.
Back post stitches are often used in patterns for hats, scarves or blankets where you want to add some extra texture or dimensionality. They can also be combined with other types of stitches like front-post doubles or crossed trebles for even more intricate designs.
If you’re new to this technique, don’t worry! With practice and patience, anyone can master it.
Crossed Stitches
These stitches involve working one stitch over another, creating a criss-cross effect that can be used in various patterns.
To create crossed stitches, you will need to work two or more stitches together in a specific order. For example, the most common type of crossed stitch is the front post double crochet (FPdc) which involves crocheting around the post of an adjacent stitch from right-to-left instead of left-to-right as usual.
Another popular variation is back post double crochet (BPdc), where you insert your hook from back-to-front around the vertical bar behind an adjacent dc-stitch before completing it like normal. This creates raised ridges on both sides of your fabric that look stunning when worked into intricate designs such as cables or basketweave patterns.
Bullion Stitch
It’s also known as the Roll Stitch or Coil Stitch because of its coiled appearance. This stitch involves wrapping the yarn around the hook multiple times before pulling it through, creating a long, twisted loop.
While this stitch may seem daunting at first, with practice and patience you’ll be able to master it in no time! The Bullion Stitch is perfect for adding detail to blankets, scarves or even clothing items like cardigans.
To create this beautiful stitch start by making a chain of desired length then insert your hook into the second chain from your hook. Yarn over (yo) twice then insert your hook back into that same chain space again yo pull up another loop but do not complete any stitches yet instead continue yarning over until you have 7 loops on your crochet needle.
Next carefully slide all seven loops off onto one finger while holding them together tightly with other hand use working yarn end to wrap around all seven loops several times (usually between 5-10 wraps depending on how tight you want each bullion). Once wrapped enough times push tip of needle through center hole created by wrapped strands so they are now sitting behind work piece.
Finally finish off bullion by yarning over once more pulling through remaining two loops left on crochet needle completing single crocheting process.
Waffle Stitch
It’s perfect for blankets, scarves, and other cozy items. This stitch involves working in the front loop and back loop of each stitch to create raised squares that resemble the texture of a waffle.
To work this stitch, you’ll need to know how to single crochet (sc) and double crochet (dc). The basic pattern consists of alternating rows of sc and dc stitches worked in the front loops only on one row and then through both loops on the next row.
One great thing about this versatile stitch is that it can be customized by changing up colors or using different yarn weights. You can also experiment with adding more or fewer rows between your waffle sections for different effects.
Cable Stitch
It’s perfect for adding texture and depth to your projects, such as scarves, blankets, or even sweaters. The cable stitch involves crossing stitches over each other to create the distinctive look.
To achieve this effect, you’ll need to work with at least four stitches: two background stitches (usually double crochets) and two front post treble crochets (FPTC). You’ll start by working the first background stitch before moving on to the FPTCs.
To make an FPTC, you will insert your hook from front-to-back around the post of a previous double crochet in one row below your current row.
Next comes another background stitch followed by another set of FPTCs but this time they are worked around 2nd dc from behind in previous rows instead of just one like before. This process is repeated until you have completed all necessary rows for creating cables.
Basketweave Stitch
This stitch is perfect for creating cozy blankets, scarves, and even home decor items like baskets or placemats.
To create the basketweave stitch, you will need to know how to work front post double crochets (FPDC) and back post double crochets (BPDC). These stitches are worked around the posts of previous stitches rather than into the top loops.
By alternating between FPDCs and BPDCs in specific sequences over multiple rows, you can create an interlocking pattern that resembles woven fabric. The result is not only visually stunning but also adds extra thickness and warmth to your project.
Experiment with different yarn colors or try using variegated yarn for added interest. You can also play around with different widths by adjusting your starting chain length or adding more repeats of the pattern sequence.
Granite Stitch
It gets its name from the texture it creates, which resembles the look of granite stone. This stitch is perfect for creating blankets, scarves, hats or any project where you want to add some depth and texture.
To create this stitch, you will need to know how to do a chain stitch and double crochet. The pattern involves alternating between two rows of double crochets with one row of chain stitches in between them.
One great thing about the Granite Stitch is that it’s reversible! Both sides have an interesting texture so your finished project will look great no matter which side faces up.
If you’re looking for a new challenge or just want to try something different with your crocheting skills then give the Granite Stitch a try! You’ll love how easy it is once you get started and how impressive your finished product looks when complete.
FAQ
How many crochet knots are there?
There are over 150 crochet knots or "stitch patterns" available since crochet was invented.
What is Celtic crochet?
Celtic crochet, also known as the Celtic Weave Stitch, is a crochet technique that creates a thick, warm, and textured fabric resembling basket weaving, using front and back post trebles and is ideal for projects like pot holders, baby blankets, afghans, and handbags.
What is the most popular crochet stitch?
The most popular crochet stitch is the double crochet stitch, often abbreviated as dc, which is common and fast to use.
What are the basic crochet stitches every beginner should learn?
Basic crochet stitches for beginners include slip knot, chain stitch, single crochet, double crochet, and treble crochet.
How do intricate crochet knots like broomstick lace and hairpin lace differ from each other?
Answer: Broomstick lace involves using a large knitting needle or dowel to create loops, while hairpin lace is made by wrapping yarn around a hairpin-like tool to create a series of loops held together by crochet stitches.
Can you explain the difference between Tunisian crochet and traditional crochet techniques?
Answer: Tunisian crochet involves using a longer hook and working with multiple loops on the hook at once, while traditional crochet uses a shorter hook and works with one loop at a time.
Related Posts
 Easy Crochet Gnome Pattern Free: Transform Yarn into Whimsical Friends
 Crochet Star Blanket: A Stellar DIY Guide
 How to Crochet Slippers for Beginners Step by Step with Pictures: Cozy Feet Awaits
 Adjustable Ring Crochet: Master the Magic Circle
 How to Crochet Without a Hook: Hands-On Creativity