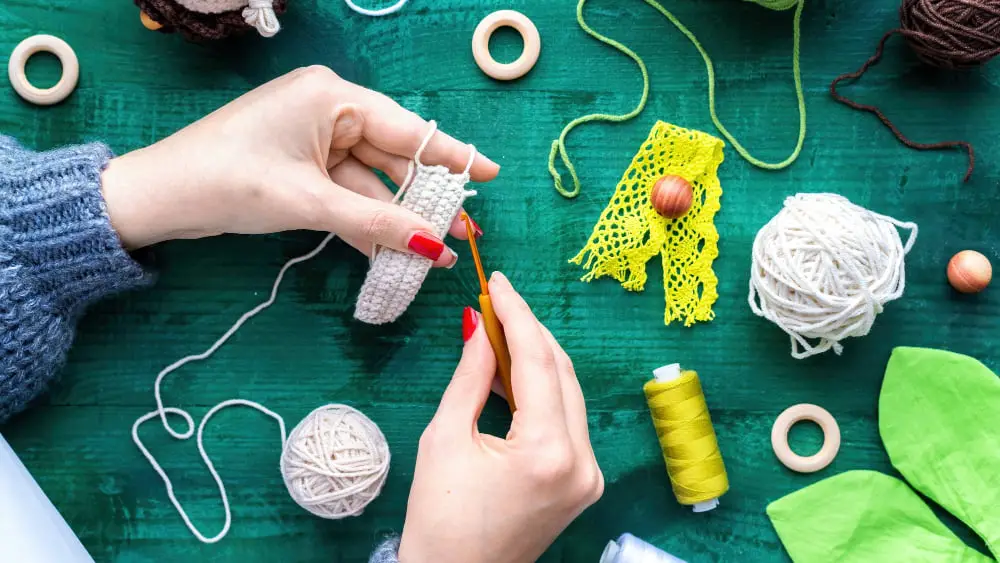
Explore the process of joining yarn in crocheting, an essential skill that can enhance your projects and provide a seamless finish.
Joining yarn in crocheting is a common task that can be accomplished in several ways. Each method has its own benefits, and the best one for you depends on your project and personal preference. This guide will walk you through the most popular methods, including the Russian join, the magic knot, and the invisible join. It will also provide tips on how to choose the right method for your project, how to handle color changes, and how to deal with ends.
Whether you’re a beginner or an experienced crocheter, you’ll find the information you need to join yarn seamlessly and keep your work looking neat and professional.
Key takeaways:
- Join yarn in crocheting for seamless finish
- Essential tips: discreet joins, matching toughness, even spacing, tidy ends
- Last yarn over: drop old yarn, bring in new strand
- Magic knot: knots with loops, trim excess for invisible join
- Russian join: thread needle, create loops, pull tight for seamless join
Essentials of Joining Yarn in Crocheting
Joining yarn in crocheting warrants understanding of a few essential pointers. An abrupt end of yarn doesn’t mean you must terminate your project. Instead, it marks the chance to integrate a new skein or color into your work, thereby extending your crochet pieces or perhaps adding a desirable splash of coloration.
One of the critical elements to keep in mind is that the join should be as unnoticeable as possible to maintain the uniformity of the project. Hence, striving for discreet joins that vanish into the overall pattern is always advised.
Next, the toughness of the join should parallel the yarn’s strength. A well-executed yarn join will not unravel or break under stress, ensuring the overall longevity of the crochet item.
It is another wise practice to ensure that the joins are evenly spaced throughout the project instead of clustering them together. This allotment ensures an even weight distribution and keeps the texture consistent.
Lastly, remember to leave adequate tail length when joining the new yarn. This leftover bit can be woven into the work after the join to further secure it, creating tidy ends and a more professional look.
Performing the Last Yarn Over of a Stitch to Join Yarn
To successfully perform the ‘last yarn over’ technique, follow these steps:
First, locate the yarn end you’re currently working with and proceed to the point in your stitch where you have only one last ‘yarn over’ and pull through remaining.
Next, you shouldn’t complete this final process with the existing yarn. Instead, drop the old yarn and bring up your new strand.
With your new yarn, conduct the last ‘yarn over’ and pull through the remaining loops on your crochet hook.
Finally, to maintain a secure and neat finish, ensure you crochet over the ends of both your new and old yarn strands as you continue with your pattern. This manoeuvre assists in securing the joined yarns and avoiding unravelling in future.
Remember, tightness in this process should be avoided, as it can lead to distortion in your crochet work. Let the tension of your new yarn be synonymous with the old for a uniform crochet piece.
Procedure of the Magic Knot Method for Yarn Joining in Crochet
Begin by placing the two yarn ends parallel to each other in opposite directions. The tail of the old yarn should be facing the same direction as the working end of the new yarn.
Create a knot with the new yarn around the old yarn, leaving a small loop at the end, and thread the tail of the new yarn through this loop. Pull on the tail of the new yarn to tighten the knot.
Repeat the procedure, creating a knot with the old yarn around the new yarn this time. Be sure both knots are sitting snugly next to one another.
Slide the knots towards one another until they’re safely locked together. Trim off the excess yarn close to each knot to tidy up your work.
Remember, the magic knot is incredibly strong and durable, offering a secure and near invisible join in your crochet project. After you’ve mastered this technique, try your hand at some of the other methods for a comprehensive understanding of yarn joining in crochet.
Exploring the Mechanism of Russian Join Technique for Seamless Crochet
Begin the Russian Join by threading a yarn needle with one of the yarn ends. Working on a length of several inches will suffice. Now, insert the needle back into the yarn, threading it through the fibers for some distance. This may take a little wriggling.
Once threaded, pull the yarn through but don’t pull it all the way. You’ll end up with a loop at the end. Cut the excess, leaving a tail. This loop will be on the left side.
Next, take the new yarn and thread the needle with its end. Take your needle and put it through the loop you made with the first yarn. With your needle, make a similar loop on the right side by threading it through the new yarn in the same way.
At this point, you should have two loops, one on each end of where your yarns meet. The last step is to pull both ends of your yarn, sliding the loops towards each other until they meet in the middle and form a solid knot.
It’s crucial to give a good yank on both ends to make sure the join is secure. After that, you can snip off any tails that might be remaining, but be careful not to cut into your join.
The Russian Join ultimately creates a seamless and bulk-free join, ideal for those looking to have an invisible transition from one yarn to the other in their crochet projects.
Mastering the Felted Join Method in Crocheting
To master the Felted Join, choose two pieces of wool yarn. Remember, this method only works with wool or other animal fibers that can be felted. Synthetic or plant-based yarns are unsuitable for this method.
You will first have to untwist the ends of each yarn to expose the individual fibers, which aids in the felting process. Then, lay the untwisted ends overlapping each other, ensuring there is enough overlap for the fibers to mesh together.
Next is the felting process. Dampen your fingers with warm water and rub them briskly back and forth across the overlapped yarn ends. The heat, moisture, and friction will entwine and condense the fibers, resulting in a secure, nearly invisible join.
If done correctly, your new yarn should be seamlessly joined, and you can continue crocheting without any knots or ends to weave in later.
Keep practicing this method. The felting process may take some trial and error to get right, but once you do, it will become a favorite technique in your crochet toolbox. A helpful tip to remember is that the join gets stronger as it dries, so don’t be disheartened if it seems a bit loose initially.
Lastly, always make sure to test the joined yarn by tugging it to guarantee its strength before incorporating it into your project.
Practical Tips for Efficient Yarn Joining in Crochet
Maintaining the same thickness is imperative when joining a new ball or skein of yarn. This keeps the uniformity of the stitches intact. If the yarn’s thickness differs, it can disrupt the overall crocheting project.
Select a crochet stitch that’s secure yet hides well within your project for the join. Knots are common but tend to disrupt the crocheting flow and the textile’s texture.
Try to anticipate yarn changes beforehand. When the yarn ball or skein is about to end, plan the change. Joining new yarn at the end of a row or round often works best, as it minimizes visible imperfections.
Consider color changes. If the yarn color differs from the primary one, a sudden switch can look jarring. Introduce a new shade gradually, altering colors for several stitches at row’s end before switching fully.
Choose the right method for the right project. While magic knot suits most situations, the Russian join might be preferential for lacework or delicate patterns.
Working with yarns that felt will allow you to use the splicing method, creating strong joins that blend into the crochet’s pattern.
Understanding your yarn’s material is also essential. Synthetic or slippery yarns require tight, secure joins while woolen or fuzzy yarns may need a different approach.
Finally, always practice a new joining technique on a test swatch before applying it to an actual project. This familiarizes your hands with the method, minimizing potential errors in the final piece.
Pitfalls to Avoid During the Yarn Joining Process in Crochet
Avoid abrupt color changes, which can mar the aesthetics of your work. Instead, plan color changes strategically by incorporating them in your stitch patterns.
Don’t be tempted to rush the joining process. Ensure all knots are secure and knots and tails are well hidden, as sloppy joins can unravel over time, leading to a disappointing result.
Prevent the new yarn from sticking out, an untidy finish can betray the presence of a join. Make sure to always weave your ends securely into the fabric of your crochet piece.
Abstain from creating overly bulky joins that not only disrupt the uniformity of your stitches but also may be uncomfortable in wearable items.
Ensure you have enough yarn to complete a planned join. Running out mid-process can result in a weak join or having to undo your work.
Avoid using different types or thicknesses of yarn in one project unless it’s intended for design purposes. Mixing yarn can complicate the joining process and result in a inconsistent finished product.
Lastly, skipping the crucial step of testing the strength of your join may lead to a failed join in the future. Always give a gentle tug to your yarn after joining to ensure that it is secure.
FAQ
What is the most secure yarn join?
The most secure yarn join is the Russian Join, acclaimed for its robust hold and undetectable finish.
What are some common methods for joining new yarn in the middle of a crocheting project?
Some common methods for joining new yarn in the middle of a crocheting project include the Russian join, the magic knot, and simply tying the new yarn to the old with a square knot.
What are the advantages and disadvantages of the Russian Join for using in crochet work?
The Russian Join offers advantages such as eliminating the need to weave in loose ends and providing a seamless and sturdy transition between yarns, but disadvantages include it being time-consuming and potentially difficult for beginners.
How does the Magic Knot technique differ from other yarn joining methods in crochet?
The Magic Knot technique in crochet differs from other yarn joining methods as it creates a secure, nearly invisible join that works well with nearly any yarn type without the need for weaving in ends.
Related Posts
 Easy Crochet Gnome Pattern Free: Transform Yarn into Whimsical Friends
 Crochet Star Blanket: A Stellar DIY Guide
 How to Crochet Slippers for Beginners Step by Step with Pictures: Cozy Feet Awaits
 Adjustable Ring Crochet: Master the Magic Circle
 How to Crochet Without a Hook: Hands-On Creativity